
Python installation
Python Installation
Python 2 and Python 3 are the two main versions of Python. For both versions, the installation process may be different. The installation would also vary for different operating systems (OS) like Windows, macOS and Linux. It is possible for Python to be already installed with your OS but it may be an outdated version in some cases. In this tutorial, we will looking into how we can install Python for each of these OS.
Installing Python in Windows
It may be unlikely for a Windows system to come with Python already installed. Nevertheless, you can visit the Python.org website to find the Python releases for Windows to install in your system. First, we will be looking into the step-by-step process of installing Python 3 for Windows followed by Python 2.
Python 3 installation on Windows
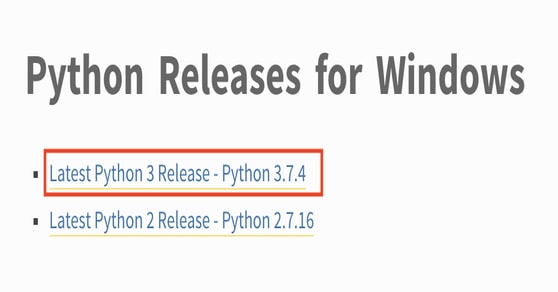
Step 1: The first step is to download the installer for Python 3. You can find the installer at Python.org (Python Releases for Windows). When you open the page, you would find a heading on top of the page that reads Python Releases for Windows. Under the heading, you will find two links that will direct you to the Latest Python 3 Release and Latest Python 2 Release as shown below. Click on the link that says Latest Python 3 Release – Python 3.x.x.
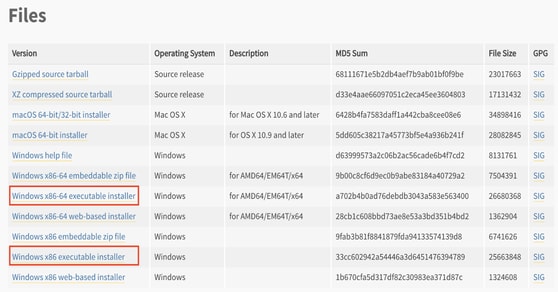
Next, scroll down and you will see a heading called Files under which you will select one of the installer as highlighted below. You can either select Windows x86-64 installer for 64-bit or Windows x86 installer for 32-bit depending on your processer. A 32-bit installer would work on a 64-bit processer as well.
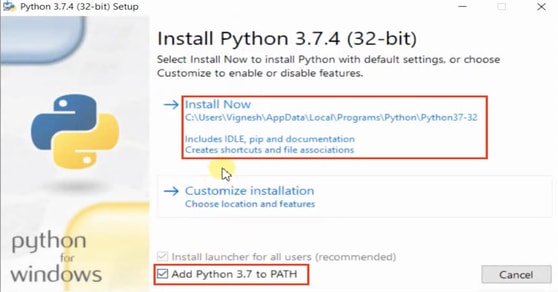
Step 2: After downloading the installer, the next step is to run the installer. To run the installer, double click the installer file that you have just downloaded. You will see the following pop up. Below the pop up, make sure you select Add Python 3.x to PATH so that your interpreter will be placed in your execution path. Next, click Install Now. In a while, your Python 3 installation will be set up and should be ready for use.
Step 3 (optional): You can check if Python has been successfully installed in your system by opening the Command Prompt and typing in the following command below:
python --version
OR
python
Python 2 installation on Windows
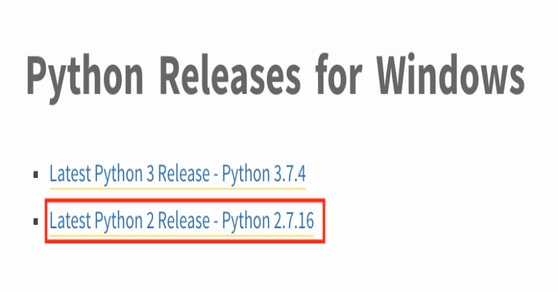
Step 1: The first step is to download the installer for Python 2. You can find the installer at Python.org (Python Releases for Windows). When you open the page, you would find a heading on top of the page that reads Python Releases for Windows. Under the heading, you will find two links that will direct you to the Latest Python 3 Release and Latest Python 2 Release as shown below. Click on the link that says Latest Python 2 Release – Python 2.x.x.
Next, scroll down and you will see a heading called Files under which you will select one of the installers as highlighted below. You can either select Windows x86-64 MSI installer for 64-bit or Windows x86 installer for 32-bit depending on your processer. A 32-bit installer would work on a 64-bit processer as well.
Step 2: Once the installer file has been downloaded, the next step would be to run the installer. Double click on the file and a pop up should appear as shown below. Click on Run.

You can keep the default selection Install for all users and click on Next.

Select the destination directory where you want to install your Python file. Otherwise, you can keep it in the default directory. After that, click on Next.

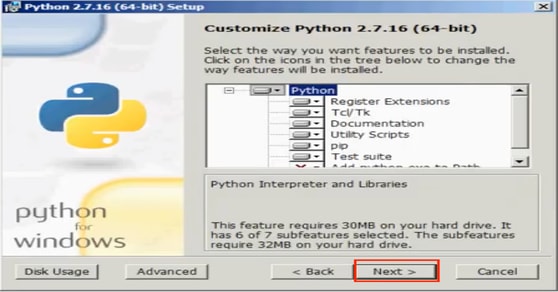
You can choose to customize your Python but you can keep it as it is for now and click on Next.
Wait for a while for your Python to get installed and that’s it!
Step 3 (optional): You can check if Python 2 has been successfully installed in your system by opening the Command Prompt and typing in the following command below:
python -v
OR
python
Installing Python in macOS / Mac OS X
Most of the newer versions of Mac would have Python installed in them. It would generally include a version of Python and may have been outdated by a few months. You can check this by using the following commands in your Mac Terminal. The first command may show your default version of Python. You can also type in the second command to check if you have Python 3 installed in your system.
python –-version
OR
python3
If you need to install Python, you can visit the Python.org website to find the Python releases for macOS. Otherwise, the best way to install Python 3 for macOS is to initially install a package manager called Homebrew. Homebrew has the benefit of making it easier for you to keep your Python installation up-to-date. First, we will look into how we can install Python using Homebrew.
Install Python using Homebrew in macOS
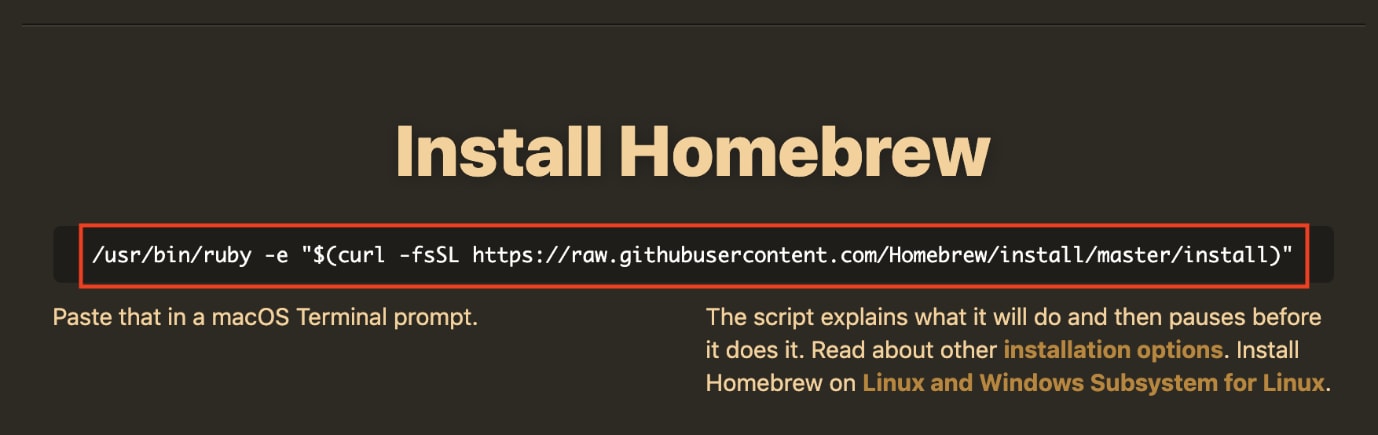
Step 1: To install Python using Homebrew, you would first have to install Homebrew. To do this, go to http://brew.sh/. Once the page is open, copy the entire code under Install Homebrew as highlighted below and paste it into your Terminal.
Once you paste the code in your Terminal and hit return, you will be required to enter your account password. Once that’s done, wait for the installation process to complete. Upon completion, you should receive a message that says Installation successful!

Step 2: Finally, the next step to install Python. So once Homebrew has been installed, you can go down to your Terminal and enter one of the command below depending on the Python version you want to install. Note that the dollar $ symbol is just an indicator that this is a console command so make sure you do not add that in the command.
By entering this command, the latest version of Python 3 will be installed in your system.
$ brew install python3
By entering this command, the latest version of Python 2 will be installed in your system.
$ brew install python@2
Upon successful installation of Python, you should receive the following message in your console. Now, you should be able to use the latest version of Python.

Step 3 (optional): You can test if everything has been set correctly by launching your Terminal. Type pip3 and hit return. You should be able to see Usage and Commands from Pip package manager if everything went well.
Install Python 3 and Python 2 without Homebrew in macOS
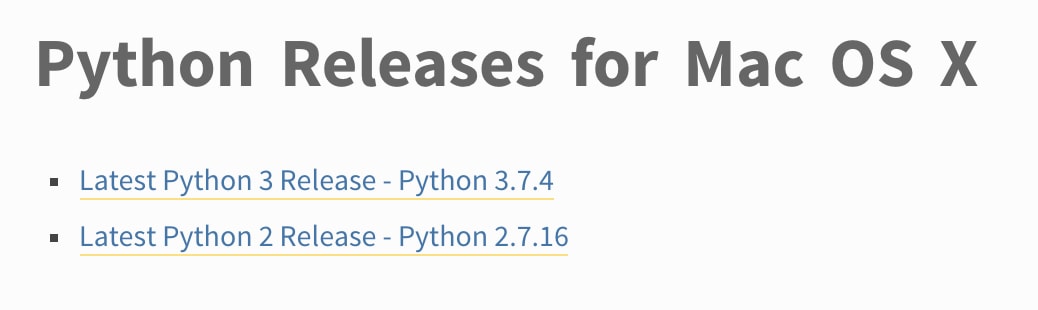
You can visit python.org to find the Python releases for Mac OS X. On top of the page, you would find the latest version of Python 3 and Python 2. You can either click on Latest Python 3 Release – Python 3.x.x or Latest Python 2 Release – Python 2.x.x depending on the version you want to install.
Scroll down under Files to select to download one of the installers for Mac OS X as highlighted.

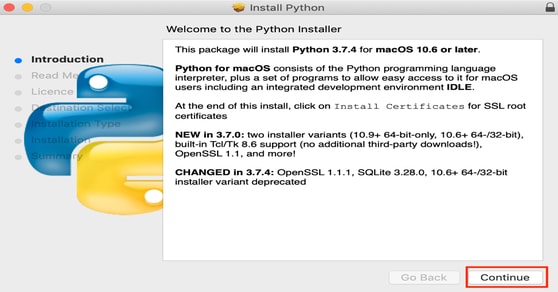
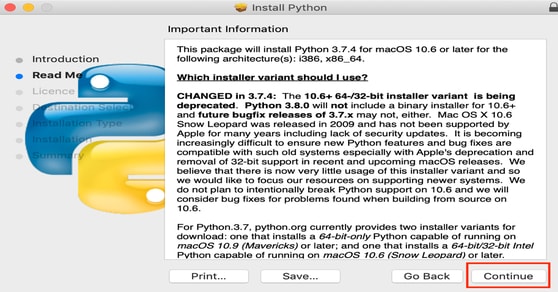
Step 2: Once the installer file has been downloaded, click on it to run the installer. You should receive a pop up as shown below. Click Continue for all the following pop ups.

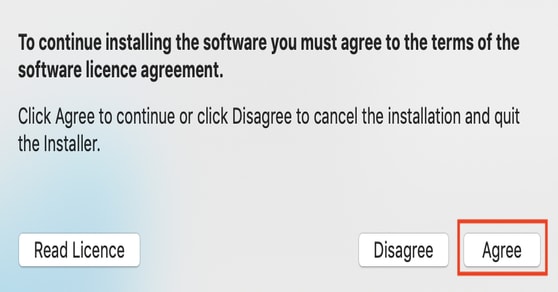
Agree to the terms of the software licence agreement to proceed with the installation.
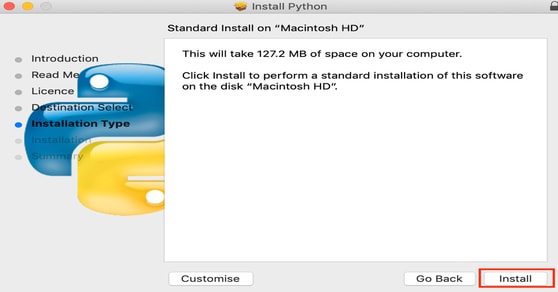
After agreeing to the terms and conditions, on the next pop up, click Install.
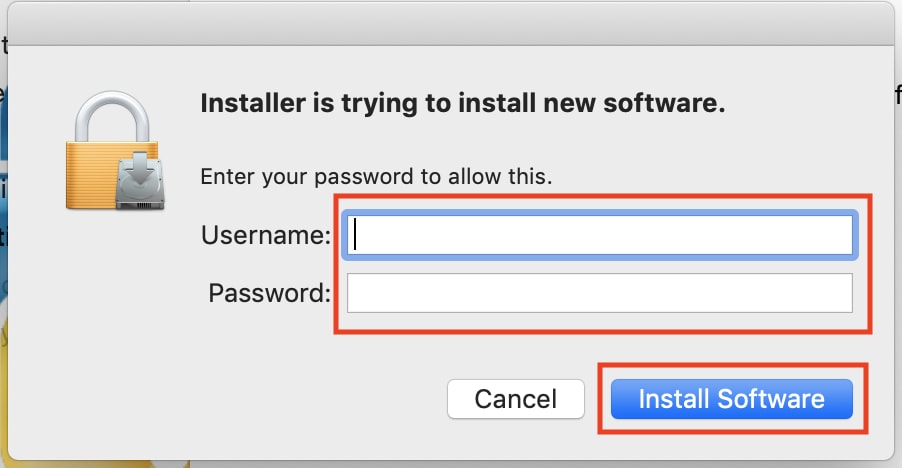
After clicking on Install, you will be prompted to enter your Username and account Password to allow Python installation. After entering your credentials, click Install Software.
Once that’s done, the Python installation should start as shown below. After the installation has been completed, click on Continue.

Finally, you should receive a Congratulations message stating that Python was successfully installed. Click Close. You should be able to use Python now.

Installing Python in Linux
There are various Linux-based operating systems such as Ubuntu, Fedora, Debian, etc. Most of the newer versions of Linux should have Python already installed in the system. However, it may not be the most updated version. You can check this by typing the following commands (excluding the dollar $ symbol) in Terminal:
For Python3:
$ python3 –version
For Python2:
$ python2 –version
For Python:
$ python –version
You should see the following output:

If you are using Ubuntu, you should be able to easily install Python 2.7 or Python 3.6 by entering the following commands.
$ sudo apt-get update
OR
$ sudo apt-get update$ sudo apt-get install python2.7
Install Python in Ubuntu
Different distributions of Ubuntu would have different methods of installing Python. You can check your Ubuntu version by running the commands below:
$ lsb_release -aDistri ID: Ubuntu
Description:  Ubuntu
Releases : 16.04.4
Codename:  xenial
- Ubuntu 17.10, Ubuntu 18.04 and above: It comes preinstalled with Python 3.6.
- Ubuntu 16.10 and Ubuntu 17.04:
$ sudo apt-get update$ sudo apt-get – python3.6 install
Install Python in Linux Mint
You can use the same instruction as Ubuntu 14.04 (above) for Mint.
Install Python in Debian
Debian may not come installed with the sudo command by default. In such a case, you need to install sudo by entering the following commands:
$ su
$ apt-get install sudo
$ vi /etc/sudoers
Once that’s done, open the /etc/sudoers file by using sudo vim a text editor.
your_username ALL=(ALL) ALL
You can also try the following commands to install Python 2 versions
$ sudo apt-get python2.6
You can try the following commands to install Python 3 versions
$ sudo apt-get python3.1
Install Python in FedoraYou can install Python 3.6 by using the following commands.
$ sudo dnf install python36
Install Python in Arch Linux
Arch Linux is liely to have the latest version of Python. If not, you can use the following command to install it:
$ packman -S python
Install Python in openSUSE
$ sudu zypper install -t pattern devel_C_C++

 +1 201-949-7520
 +91-9707 240 250