
SQL Tutorial for Beginners
SQL Tutorial
SQL is a very easy database Language to learn and it requires no programming background . It was initially known as SEQUEL and is mainly used to query data from database, manipulate the data and retrieve data from relational database. The term Relational database means to relate structured data in the table. SQL is considered as a standard language for relational database management system and it is also known as data-oriented language The power of SQL is with a single command line we can access many records and we can fetch data based on specific criteria.
Table is represented into rows and columns also known as tuple or records and fields. SQL uses ‘;’ as a statement terminator. SQL command fall into Data Definition Language(DDL) , Data Manipulation Language(DML) , Data Query Language(DQL) , Data Control Language(DCL) , Transaction Control Language(TCL) . A database query can be either a select query or a action query .A select query is used to retrieve data using query while an action query asks for additional operations on data like insertion, updating , deletion. Data Definition Language is used to define the structure of the database. Data Manipulation Language is used to manipulate data. Data Query Language is used to extract the data. We can also use various Aggregation Functions in SQL like Count(count the number of the rows in a relation) , SUM(Adds the value of an attribute in a relation) , GROUP BY (Group the records of a relation based on an attribute or group of attribute).
Data Control Language(DCL) is used to assign and revoke database rights and permissions. SQL Supports Distributed Databases as it is capable of running in several computer network at a time. It uses many important clauses like FROM (which indicate the table where the search will be made) , WHERE (Search will be carried out) , ORDER BY ( To sort the results in ascending or descending order).
A Basic SQL query would be like :
SELECT * FROM
TABLE_NAME WHERE CONDITION
ORDER BY COLUMN_NAME;
The most commonly used commands are : Select , Insert , Update , Delete , Create , and Drop which can be used to do many operations in database.
Conditional selections used in the where clause:
| = | Equal |
| > | Greater than |
| < | Less than |
| >= | Greater than or equal |
| <= | Less than or equal |
| <> | Not equal to |
SELECT Statement
“SELECT” is a keyword which will select the data which ever you are referring.
Example:
SELECT * from Table1;
Here * denotes all and also we can specify the particular column to SELECT Keyword. Also you can use “DISTINCT” Keyword to fetch unique columns.
WHERE Clause:
“WHERE” Clause is used to filter records.
Example:
SELECT * FROM Table1 where Name=”Rahul”;
The above statement will only display the record containing the Name: Rahul.
Most Commonly used SQL WildCard Characters are : * and ? which means Zero or more characters and single character. If we need to insert multiple values in the WHERE clause then SQL IN Keyword is preferred.
UPDATE Statement:
“UPDATE” Statement is used to modify the existing record in the table.
Example:
UPDATE Table1 Set Location=”Chennai” where Name=”Rahul”;
Here Set is used to change the existing data with the new one based on the condition.
DELETE Statement:
“DELETE” statement is used to delete the existing records in the table.
Example:
DELETE From Table1 where Name=”Rahul”;
INSERT INTO Statement:
“INSERT INTO” is used to insert new records in the table.
Example:
INSERT INTO Table1 (Name,Location) values(“Ravi”,”Chennai”);
We have a way to impose rule to the data in the table which is commonly known as SQL Constraints and the commonly used are
- NOT NULL (To ensure column doesn’t contain null values)
- UNIQUE (To ensure unique values in a column)
- Primary Key (Not Null and Uniquely identifies each row in a table)
- Foreign key(Referring primary key in another table)
Note: A Field with a null value is considered as no value and also NULL Value is different from a Zero or a field that contains spaces.
We have a concept in SQL called Key which means single or combination of multiple fields in a table).
There is a concept called SQL VIEW which refers to a virtual table which contains rows and columns.
We also have SQL Union Operator which is used to combine result set of two or more SELECT statements. There is a difference between Union and Union ALL as Union returns all the values whereas Union ALL returns only the distinct values.
SQL Aliases are used to give a table temporary name and it is used when we are using more than one tables.
We also have a concept called SQL TOP which is used to select how many records to be displayed in the output. Also LIMIT is used to return the limited number of results.
Hope I have covered few topics in SQL which are commonly used to give a glimpse of the course.
SQl Joins
We have a concept of SQL JOIN which is used to combine rows from two or more tables based on common column between the tables.
There are five types of SQL Joins :
- SQL Inner Join (returns matching values)
- SQL Left Join (returns all records from the left table and matching records from the right table)
- SQL Right Join (returns all records from the right table and matching records from the left table)
- SQL Full Join (returns matched records from left and right table)
- SQL Self Join (returns data based on the condition and same table is joined with itself)
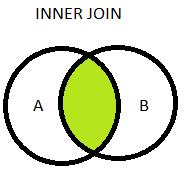
Inner Join:
Used to retrieve all records from table A and table B where the join condition is met – retrieves common records from both the tables based on the join condition.
Example:
select columns from tableA t1
inner join tableB t2
on t1.col=t2.col;
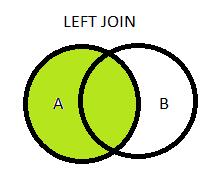
 Left Join (Left Outer Join):
Used to retrieve all records from table A along with records from table B for which the join condition is met – retrieves all table A records, unique columns of table B and appends NULL values to table B columns if values are empty.
Example:
select columns from tableA t1
left join tableB t2
on t1.col=t2.col;
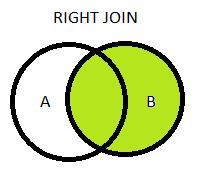
Right Join (Right Outer Join):
Used to retrieve all records from table B and subsequent records of table A where the join conditions are met.
Example:
select columns from tableA t1
right join tableB t2
on t1.col=t2.col;
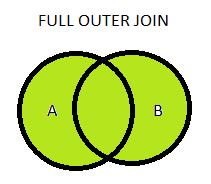
Full Join (Full Outer Join):
Used to retrieve all records from both the tables including irrespective of the join condition – retrieves all the records even if the join condition is not met
Example:
select columns from tableA t1
full join tableB t2
on t1.col=t2.col;
SQL- Select Statements
This statement is the most frequently used statement in SQL. This used to fetch the data from the database which we store in a table. We can fetch the complete record of the table either we can apply some condition with a select statement that will be giving result set or record based on the condition.
We can specify the column as well which has to fetch from the table or can fetch all the columns of the table, It completely depends on how you are going to write the syntax for the select statement. If you have applied some rules or conditions on the select statement first it is going to filter the data based on the same and include all the data to be fetched for the respective columns.
The database driver evaluates the select statement as first and last clauses to build the result-set and the same will be shown as the final result.
Syntax – Below is the syntax for the select statement.
If you want to select all the columns from the table.
SELECT * FROM TABLE_NAME;
If you want to select some specified columns from table.
SELECT COL1,COL2,COL3,COL5 FROM TABLE_NAME;
Now let see how this statement works into real-time and how we used to apply rules/condition on the select statement.
SELECT [DISTINCT] , columns [column [AS aliasname]} FROM tableName [alias] [WHERE condition][GROUP BY fieldName(s)][HAVING condition] ORDER BY columnname;
SELECT – This keyword database know that you want to fetch the data.
DISTINCT
This used to get a unique record for the column.
[column AS aliasname] – This can be given for column and table as well. Mostly this is used to remove ambiguity error or to make a short select statement. This can be applied to fetch the different columns from different tables.
WHERE – This is optional and used to apply to put a condition on a column which filters the data while fetching the records.
GROUP BY – This is used to show the result-set as a group for the same values in the columns.
HAVING – This is also used to apply criteria and work with GROUP BY
ORDER BY – This is used to apply sorting order on records/result-set
Expressions in SELECT Statement? – Many arithmetic operators can be used with a select statement like division, multiplication, addition, subtraction. If more than one operator is used then it works based on the precedence which used to be done left to right and different based on parentheses along with used multiple operators.
Below is the EMPLOYEE_DETAILS having the following records.

EMPLOYEE_DETAILS
Let’s fetch a few columns – EMP_ID , EMP_NAME,EMP_AGE from the above table.

SELECT EMP_ID,EMP_NAME,EMP_AGE FROM EMPLOYEE_DETAILS;
Let’s write the query now to select all the columns, following is the same.
SELECT * FROM EMPLOYEE_DETAILS;
NESTED SUBQUERY
- NESTED queries it is nothing but a query which can return the data to the main query giving more detriments of the retrieving data and we are Where Clause using in embedded queries.
- It can be using in the languages DDL,DML for giving the commands Insert, Delete, Update, Select, Truncate using of the Logical operators <,>,<>,= using in the command / Statements in the given data.
SYNTAX:
SELECT column_name
FROM table_name
WHERE column_name [operator]
(SELECT column_name
FROM table_name1, [table_name2]..
WHERE condition)
WHERE:
- We are creating the Database, table and fields for giving appropriate data for all the fields.
- Consider a table as a student and we are providing the data for oldest database for the student details in the college database and using the query for displaying all the details of the students.
- There are majorly two types of nested queries:
Majorly classified into two different types are given below:
- Independent Nested Queries
- Co-related Nested Queries
Independent Nested Queries:
- This query is mainly useful for an independent and executions starts from the innermost and outer query can be executing from the inner query and the operations can be in the different ways likes IN, NOT IN, ANY, CALL, Etc.,
IN:
- If we want to find out S_IDwho are enrolled in C_NAME ‘DSA’ or ‘DBMS’, we can write it with the help of independent nested query and IN operator. From the COURSE table, we can find out C_ID for C_NAME ‘DSA’ or DBMS’ and we can use these C_IDs for finding S_IDs from STUDENT_COURSE
- We can find the values for the STUDENT Table X_ID can be enrolled with X_Name in the DBMS. We can either write or view the tables of the data contents with the help of using the independent query for a IN Query and also using this query in the COURSE Table we can predicting the Y_ID and Y_NAME in the DBMS.
How the steps can be implemented in the Independent Queries are mentioned below:
STEP 1:
Y_ID for Y_NAME =DBMS
Select Y_ID from COURSE where Y_NAME = ‘DBMS’
STEP 2:
we can implement the Y_IDusing step 1 for finding the X_ID
Select X_ID from STUDENT where Y_ID IN
(SELECT Y_ID from COURSE where Y_NAME = ’DBMS’);
NOTES:
- The inner query will return a set with members Y1 and Y3 and the outer query will return those X_IDs for which Y_IDis equal to any member of the set (C1 and C3 in this case). So, it will return to X1, X2, X3, and X4.
- This query will return a set of numbers Y1 and Y4 in the subquery and X1 and X4 in the Nested Query.
NOT IN:
- WE can find out the X_ID and X_Name using the Database Table Student are in the DBMS can be done using the query are mention below
Select X_ID from STUDENT where X_ID NOT IN
(Select X_ID from STUDENT_COURSE where Y_ID IN
(SELECT Y_ID from COURSE where Y_NAME’DBMS’));
NOTES:
- The inner query will return a set with members Y1 and Y3 and the outer query will return those X_IDs for which Y_IDis equal to any member of the set (C1 and C3 in this case). So, it will return to S1, S2, S3, and S4.
- This query will return a set of numbers Y1 and Y4 in the subquery and X1 and X4 in the Nested Query.
Co-related Nested Queries:
- This Query can helpful in the nested queries the output can be inner query can be currently executed in the query depending upon the required rows in the table of students and course tables.
- Consider the Student Table X_ID and X_Name can exist in the Course Table Y_ID and Y_Name data in the database.
( select * from STUDENT S where S.X_ID=S.X_ID and S.Y_ID=’X1’);
NOTES:
- For the entire row we can be using the STUDENT Table we can be providing the data STUDENT where X.X_ID= S.X_IDand S.Y_ID=’Y1’. If for an X_ID from STUDENT S, finally inner query will return the statement is true and corresponding the Student Table X_ID will be the return of output.
SAMPLE DATA – SQL QUERY
SELECT X_ID,X_Name, X_Age,X_Contact Details
FROM STUDENT
WHERE AGE = (SELECT MAX(AGE) FROM STUDENT)
NOTES:
- Using this query but, initially, the subquery will be executed then it will display the data for the entire created fields in the database table student.
- Consider how this query will works before that the subquery AGE is invoked and executed at first and we are giving the data for the age in the student DB table for a student’s likewise going on.,
STUDENT TABLE
| C_ID | C_NAME |
| C1 | ANGULAR JAVA SCRIPT |
| C2 | Programming PARDIGRAMS |
| C3 | DBMS CONCEPTS |
| C4 | WEB DESIGNING |
| Y_ID | Y_NAME |
| Y1 | ANGULAR JAVA SCRIPT |
| Y2 | Programming PARDIGRAMS |
| Y3 | DBMS CONCEPTS |
| Y4 | WEB DESIGNING |
| S_ID | S_Name | S_Age | S_Contact Details |
| A1 | AJAYKUMAR | 25 | +91-98407 87895 |
| A2 | MARY CHARLES | 23 | +91-98401 23456 |
| A3 | ANDREW MOHANRAJ | 22 | +91-63867 89562 |
| A4 | MERRY KALIDAS | 25 | +91-78747 57678 |
| Y_ID | Y_NAME |
| Y1 | ANGULAR JAVA SCRIPT |
| Y4 | WEB DESIGNING |
STUDENT TABLE and COURSE TABLE
| X_ID | X_Name | X_Age | X_Contact Details |
| X1 | AJAY KUMAR | 25 | +91-98407 87895 |
| A4 | MERRY KALIDAS | 25 | +91-78747 57678 |
SQL Commands
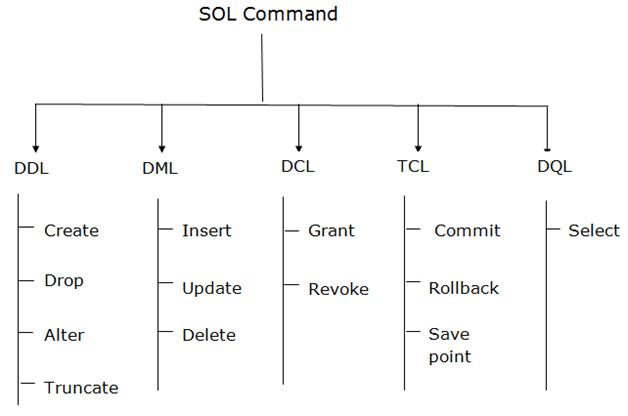
We are using the sql command four categories:
1.DDL- Data definition Language
2.DML-Data manipulation Language
3.DCL-Data Control Language
4.TCL-Transaction Control Language
1. DDL: (Auto commit)
Abbreviation of DDL is Data Definition language. In sql we are using ddl commands creating the data from schema in your database and deal with the schema object in your database.In that database schema used to create and modify and update in your data.
Here we are using below database DDL commands
Types:
- CREATE – We are using create command create the database or objects.
- ALTER – We are using the alter command structure the objects
- RENAME – We are used the add the comments
- TRUNCATE – we are using the truncate the command removed the all records
- DROP – We are using the drop command delete the objects.
CREAT :
- It is used to create a new Table in a database (SQL).
- CREATE command is a Data Definition Language
- CREATE DATABASE command is used to create a new database(schema) in the relational database management system.
- CREATE TABLE command is used to create a new table in the existing database.
- When we are creating a new table, you can mention the column name and its corresponding datatype. It is optional to mention the Primary key, Foreign Key and constraints for the table.
Example :
Create table Sale_order
( SOH_ITEM VARCHAR2(240),
SOH_QTY VARCHAR2(240),
SOH_COST VARCHAR2(240)
);
/
The Syntax to create new table is
CREATE TABLE TABLENAME(column1 dataType, column2 dataType , …………..);
Example
Let see an example to create database and table
1. First, we need to create a database as below
SQL>CREATE DATABASE Sample;
Output: Database created
To check whether database has been created , we can use the show databases command .The show databases command will list all the database in the relational database management .
SQL>show databases;
Output:
| Databases |
| Sample |
- After creating the database, we have to use the database to create the tables inside the database.
Syntax to use the Database as follows
USE DatabaseName;
To use the sample database , provide the below query.
SQL>use Sample;
- Now, we can create the table using the below query , so the table will stored inside the Sample database
SQL> CREATE TABLE Student(id int, name varchar(30),address varchar(100));
OUTPUT: Table Created
The above command will create a new table with the id, name, and address. Where the column id will store an integer, the name will hold up to 30 characters and address will hold upto 100 characters.
If you are not logged into the database or not giving the use of database command, you can create a table by adding the database name. table name instead of the table name in creating command as below.
SQL> CREATE TABLE Sample.Student(id int, name varchar(30),address varchar(100));
- To view the description of the table, you can use the description command as below
The Syntax for description command
desc table name;
for viewing the description of the table Student, we can use the below query. The desc command shows only the column name, datatype corresponding to the column name and constraints if any.
SQL> desc Student;
OUTPUT:
Name Null Type
ID INT
NAME VARCHAR2(30)
ADDRESS VARCHAR2(100)
- We can use the select command to view all the data along with the column name in the table
The Syntax for a select statement as below
select * from table name;
For selecting the rows of data from student table, the query as follows
SQL> select * from Student;
Output :
| Id | name | Address |
- Table name should be unique in the database
SQL>create table Student(id int);
Output: Table or view aleady exists
In the above the , we are creating the table with name Student but tablename is already available in the database, so it does not created the table with same name and shows table or view already exists.
Create a table with a primary key
We can provide the primary key of the column at the time of table creation.
Syntax for creating table with primary key
CREATE TABLE TABLENAME(column1 datatype, column2 datatype,….,PRIMARY KEY(column name));
Example
CREATE TABLE EMPLOYEE(emp_id int,emp_name varchar(20), PRIMARY KEY(id));
Note: Primary Key should always contains the unique value
ALTER:
It is used to Alter the existing data type of a column or Resizing of data type or
Sometimes Renaming of column name , add column and drop column in table
Example :
Alter table sale_order modify SOH_QTY NUMBER;
RENAME :
It is used to Rename of existing Table name in a database , also rename the existing column in a table , modify the data types of existing column.
Example 1 :
Alter table sale_order Rename column SOH_COST to SOH_TOT_COST ;
Example 2 :
Alter table sale_order Rename to Sale_order_details ;
Example 3 :
Alter table sale_order DROP column SOH_COST;
TRUNCATE :
- It is used to delete all the data from a table with auto-commit
- Truncate is a Data Definition Language command.
- Truncate is used to remove all the data or rows from the table. It is mandatory to have ALTER permission on the table to perform the truncate command.
- The truncate command is much faster than delete command.
- The difference between truncate will only remove all rows and data from the table but drop will remove the entire table from the database.
- The major disadvantages of Truncate is, we cannot use the where clause
The Syntax for the truncate command is
TRUNCATE TABLE TABLE_NAME;
Example 1 :
sql plus >select count(*) from sale_order ;
Output:
10 rows selected
Sql plus > Truncate table sale_order ;
Output
Table TEMP1 truncated.
Sql plus > select count(*) from sale_order ;
Output
0 row selected
For Example
TRUNCATE TABLE employee;
Consider the below Student table
| Customer_id | Customer_Name | Customer_Phone |
| 105 | Ram | 7878787878 |
| 107 | Surya | 8988989898 |
SQL> select * from Student;
| Customer_id | Customer_Name | Customer_Phone |
| 105 | Ram | 7878787878 |
| 107 | Surya | 8988989898 |
SQL>TRUNCATE table Student;
Now all the data will be deleted from the table and if you give select statement now , it will show only column name because it does not have any data since we performed the truncate command in the table
SQL>select * from Student;
Output:
| Customer_id | Customer_Name | Customer_Phone |
DROP :
- Drop is used to droppingping the entire table with data or some times used to drop the column in a table
- DROP is a Data Definition Language command.
- DROP is used to remove existing database objects such as database, function, procedure, view, user, and table.
- When DROP command used in the table, it removes all rows or data from tables and also removes the table as well as it rows.
- DROP table command will remove all the indexes, triggers, privileges, constraints and permission specifications of the table.
- It is mandatory to have ALTER permission on the table or database to perform the DROP command
- Be careful while dropping the table or table, it is not possible to recover the data after deleting the table or database
- In Oracle, if the table is dropped, it will be automatically moved to recycle bin as of Oracle 11 g.
- Before deleting the table, it is advisable to delete all the foreign key reference to that particular table.
- DROP table command is used to delete the complete table structure from the database
Example 1: Drop table sale_order ;
- Table sale_order dropped
Example 1: Alter table sale_order drop column SOH_TOTAL_COST ;
- Column SOH_TOTAL_COST dropped
Syntax to drop database
Drop Database DatabaseName;
Example – Drop Database Admin;
Syntax to drop function
Drop Function FunctionName;
Example – Drop Function ADDER;
Syntax to drop procedure
Drop Procedure ProcedureName;
Example – Drop Procedure GET_LINE;
Syntax to drop table
Drop Table TableName;
Example – Drop Database Student;
Consider the below Customer table
| Customer_id | Customer_Name | Customer_Phone |
| 105 | Ram | 7878787878 |
| 107 | Surya | 8988989898 |
SQL> select * from Customers;
| Customer_id | Customer_Name | Customer_Phone |
| 105 | Ram | 7878787878 |
| 107 | Suya | 8988989898 |
SQL>Drop table Customer;
Now the table customer will be dropped from the database, if you give select statement now it shows the table or view does not exist.
SQL>select * from Customers;
Output: Table or view does not exists.
Syntax to drop User
Drop User User _Name;
Example – Drop User ADMIN;
Syntax to drop View
Drop View View_Name;
Example – Drop View EMP_VIEW;
Note: Once the table or database is dropped, we could not recover it.
2. DML (Data Manipulation Language):
Abbreviation of DML is Data Manipulation language. In sql we are using DML command manipulation of data and present in the database.
Here most of the command in sql statements.
Type :
- INSERT – We are used to insert the data from the database
- UPDATE – We are used to update the data from entire column or particular columns
- DELETE – We are used to the delete command delete the entire records from the datasets.
- MERGE – We are used to retrieve data from database.
A transaction consists of a collection of DML statement that form a logical unit of work. A DML statement is executed when the user:
- Add new rows to a table
- Modify existing rows in a table
- Remove existing rows from a table
INSERT:
Inserts new rows into a table. You can insert a single row with the VALUES syntax, multiple rows with the VALUES syntax, or one or more rows defined by the results of a query (INSERT INTO…SELECT).
Syntax with Example:
INSERT INTO table name [ (column [, …])]
Values (values [, values.])
Example 1:
Below example shows on how to insert values into empty table when we are aware on the columns available in the table.
insert into category stage values
(12, ‘Concerts’, ‘Comedy’, ‘All stand-up comedy performances’);
Example 2:
If the user wants the create another table like category stage table with the same no of records, then the user can the below method:
Create table table-name as
Select * from category stage
Example 3:
If the user wants to insert only particular records into new table from another table then below method can be used. We can also method column and corresponding value in the insert statement
Insert into category stage
Select id, profession, category from staging
Insert into category stage (id, profession, category)
Values (12, ‘Concerts’, ‘Comedy’);
UPDATE:
UPDATE statement is used to modify existing rows with the update records. A user can update more than one tows at a time (if required).
Syntax:
UPDATE table_name SET column = {expression | DEFAULT} [,…]
[ FROM fromlist]
[ WHERE condition]
Example:
Update category stage set profession=’Teacher’, id=50 where
Name=’Allen’ and dob=’12-12-1994’
DELETE:
If the user wants to delete existing rows one or more then he can use the below method but if the user wants to delete all the rows in the table then he should go for Truncate.
Syntax for Delete and Truncate:
Delete from table-name where condition;
Truncate table table-name
Example:
Delete from staging where parent_id in (201922233,20194566) and source=’online’
Truncate table staging
MERGE:
Merge or Upsert is a combination of Both Update and insert in a single SQL statement
Example :
MERGE INTO SALE_ORDER A
USING (SELECT * FROM ITEM_MASTER) B
ON (A.SOH_ITEM = B.ITEM_CODE)
WHEN MATCHED THEN
UPDATE SET (A.SOH_TOTAL_COST = B.COST * A.SOH_QTY
WHEN NOT MATCHED THEN
INSERT INTO ITEM_MASTER (ITEM_CODE,COST) VALUES
(A.SOH_ITEM,(A.SOH_TOTAL_COST/ A.SOH_QTY));
3. DCL:
DCL is an abbreviation of Data Control Language ,by using this we can give the grant permission such as select ,delete,insert,update and create to schema Users ,Similarly we can also Revoke the given grant access such as select ,delete,insert,update and create from Schema Users. In sql we are used to the DLC data control commands to access the database based on the data.
Types:
- GRANT
- REVOKE
GRANT:
By using GRANT command , we can give the grant permission such as select ,delete,insert,update and create to schema Users in a same DB server. Here we are used to the grant command to access the data from database.
Examples:
- > Revoke select on sale_order to Ashwath;
(By using this we can Revoke the given granted select access on sale_order(table) from Ashwath (schema user )
> Revoke succeded
- > Revoke select,insert,update,delete on sale_order to GangBoard;
(By using this we can Revoke the given granted select,insert,update,delete access on sale_order(table) from Ashwath (schema user )
> Revoke succeded
- > Revoke DBA to GangBoard;
(By using this we we can Revoke the given granted grant all DBA access from the GangBoard (schema user )
> Revoke succeded
REVOKE :
By using REVOKE command , we can Revoke the given granted permission such as select, delete,insert,update and create from a schema Users in a same DB server. Here we are used to the revoke command to revoke the acesss from the database.
- > Revoke select on sale_order to Ashwath;
(By using this we can Revoke the given granted select access on sale_order(table) from Ashwath (schema user )
> Revoke succeded
- > Revoke select,insert,update,delete on sale_order to GangBoard;
(By using this we can Revoke the given granted select,insert,update,delete access on sale_order(table) from Ashwath (schema user )
> Revoke succeded
- > Revoke DBA to GangBoard;
(By using this we we can Revoke the given granted grant all DBA access from the GangBoard (schema user )
>Revoke succeded
4. TCL:
TCL is an abbreviation of Transaction control language,by using TCL Commands we can commit the DML Operations like (Update ,Delete and Insert ) and also we can rollback the DML operations which has not yet commited and also by using TCL Command we can savepoint the DML operation which is commonly used in Plsql block . In Sql we are using to the TCL commands data with the transaction from the database.
Types
- COMMIT – Here we are using the commit commands commits the transactions.
- ROLLBACK – Here we are using the rollback commands to rollback the data from the database.
- SAVEPOINT – Here we are using the Savepoint to save within the Transactions.
- SET TRANSACTIONS – Here we are specify the characterisitic for the data from the Transactions
COMMIT :
By using ‘COMMIT’ Command we can commit the DML Operations like (Update ,Delete and Insert ) Which has already done(DML)
Example :
- >Delete from SALE_ORDER
Where soh_item_code = ‘COMPUTER’;
- 1 Rows Deleted
- Commit ;
- Commit Completed
- >Update SALE_ORDER set SOH_QTY = 3 , SOH_COST =150000
Where soh_item_code = ‘COMPUTER’;
- 1 Rows Updated
- Commit ;
- Commit Completed
- >Insert into SALE_ORDER(soh_item_code,soh_qty,soh_cost)
Values(‘PRINTER’,’3’,’31000’);
- 1 Row Inserted
- Commit ;
- Commit Completed
ROLLBACK:
By using ‘ROLLBACK’ Command we can rollback the DML operations which has not yet Commited,
Example :
- >Delete from SALE_ORDER
Where soh_item_code = ‘COMPUTER’;
- 1 Rows Deleted
- Rollback ;
- Rollback Completed
- >Update SALE_ORDER set SOH_QTY = 3 , SOH_COST =150000
Where soh_item_code = ‘COMPUTER’;
- 1 Rows Updated
- Rollback ;
- Rollback Completed
- >Insert into SALE_ORDER(soh_item_code,soh_qty,soh_cost)
Values(‘PRINTER’,’3’,’31000’);
- 1 Row Inserted
- Rollback ;
- Rollback Completed
5. DQL (Data Query Langauge):
The SQL SELECT statement returns a result set of records from one or more tables. A SELECT statement retrieves zero or more rows from one or more database tables or database views.
In most applications, SELECT is the most commonly used data query language (DQL) command.
Below is the list of topics which are used under SELECT
Syntax
WITH Clause, SELECT List, FROM Clause, WHERE Clause, GROUP BY Clause, HAVING Clause
UNION, INTERSECT, and EXCEPT, ORDER BY Clause, Join Examples, Subquery Examples
Correlated Subqueries
Example SELECT Query with all the topics included:
Write a query to print Year, Producer,total current year revenue, total Previous year revenue,Revenue difference,Revenue difference percentage from the given data. Tables are given below.
Note: consider current year is 2019 and previous year is 2018
Table_name : Calendar
| year | Date |
| 2019 | 2006-09-17 |
| 2019 | 2006-07-17 |
| 2019 | 2006-06-17 |
| 2018 | 2006-05-16 |
| 2018 | 2006-04-16 |
| 2018 | 2006-03-16 |
| 2019 | 2006-02-17 |
| Advertiser_name | Item_key |
| SUPERMEDIA INC. | 794938 |
| HAGERTY INSURANCE | 796774 |
| PEPSICO – QUAKER OATS | 784384 |
| ADV/T.B.D. | 794744 |
| JOHNSON & JOHNSON – J&J | 749040 |
| OSRAM SYLVANIA | 740333 |
| UNILEVER – UNILEVER | 849303 |
| Rate | Item_key | date |
| 2004 | 794938 | 2006-09-17 |
| 4004 | 796774 | 2006-07-17 |
| 48753 | 784384 | 2006-06-17 |
| 654 | 794744 | 2006-05-16 |
| 84329 | 749040 | 2006-04-16 |
| 7480 | 740333 | 2006-03-16 |
| 4793 | 849303 | 2006-02-17 |
| Producer | Current year | Previous year | Revenue diff | Revenue diff % |
| HAGERTY INSURANCE | 261345 | 261345 | 0 | 0 |
| UNILEVER – | 0 | 14294 | -14294 | -100 |
| ADV/T.B.D. | 0 | 810918 | -810918 | -100 |
a.year in (extract(year from current_timestamp), extract(year from current_timestamp)-1) group by Year,Producer)
select top 10 cy.year, cy.Producer, cy.Revenue as “Current Year Revenue”, py.Revenue as “Previous Year Revenue”, cy.Revenue – py.Revenue as “Revenue Diff”, ((cy.Revenue – py.Revenue)/py.Revenue ) * 100 as “Revenue Diff %”
from revenue py, revenue cy where py.Year = (cy.Year – 1) and
cy.Producer = py.Producer and py.Revenue > 0 order by “Revenue Diff %” asc
The order of execution for SQL Query is
SELECT column, group_function
FROM table
Where [Condition]
Group BY [group by expression]
Having Clause [Group condition]
Order By column;
SQL UPDATE STATEMENT
In generally,we are saving a data,it’s necessary to modify on the data,when we need.
- i.e : A database contains a set of data, a update is coming, deletion is coming.so,we have to achieve those manipulations for the following commands.
- In,commands generally we are called in Queries in sql.
UPDATE STATEMENT:
- UPDATE is a structured query language (SQL) used to change or update values in a table.
- Usually has a suffix WHERE to restrict the change to a set of values that meet a specific set of criteria.
Example:
UPDATE Customers
SET ContactName = ‘Alfred’ WHERE CustomerID = 1;
[Su_table responsive=”yes”]
| CustomerID | Contactname | City |
| 1 | Smith | Australia |
| 2 | Allen | UK |
Updating records in Sql:
Example:
Update command for Single Record:
Table name:Employee
| No | Name | Place |
| 1 | Raja | India |
| 2 | Smith | USA |
| 3 | George | UK |
We want to update a single record,or a single person data update,we are going to use the below query:
Update Employee Set Place= ‘Malaysia’ where No=1;
Explanation of Above Query:
- Employee table update the place Malaysia,Where no=1,Here No 1,belongs to Raja,so the Raja Place is update from India to Malaysia
- After execute the query,the table data is below:
Table name:Employee
| No | Name | Place |
| 1 | Raja | Malaysia2 |
| 2 | Smith | UK |
| 3 | Allen | UK |
| 4 | George | India |
UPDATE MULTIPLE RECORDS:
Update Employee Set Name= ‘Raja’ where Place=’UK’;
So,whoever belongs to UK,the all person name changed into Raja.
After,the execution of the above query,the output will like this:
| S.No | Name | Place |
| 1 | Raja | Malaysia |
| 2 | Raja | UK |
| 3 | Raja | UK |
| 4 | George | India |
SQL – Order By Command
- Order By comment used to sort the output of specified columns either in Ascending or Descending format
- Ascending or Descending can be specified by short form ASC/DESC.
- On not specifying any of above sorting order the default sorting order would be Ascending.
- Sorting can be done column wise and not row wise
Syntax:
SELECT * FROM table_name ORDER BY column_name ASC|DESC
- Table name in the above syntax mentioning the name of the table.
- Column_name is specifying the targeted column name to be sorted.
- EM
Description:
- Sorting will work column wise and it will change all other corresponding values based on targeted column.
- Sorting can be done on existing table or to the newly created field.
- Sorting can be combined with all other Sql comments.
Sample:
Below is the table we going to use for Order by comment.
Table Name : EMP_St
| EMP ID | EMP Name | EMP Status |
| 151521 | Selvi | A |
| 151515 | Kamal | A |
| 151520 | Ijaz | A |
| 151522 | Selvi | A |
| 151526 | Rani | A |
| 151523 | Saravanan | A |
| 151512 | Sendil | A |
- The above table contains employee tables and it is names as EMP_st.
- In the above table EMP ID has not been sorted properly.
- Lets see how the above table changes with order by comment
Scenario 1: (Order by Ascending)
SELECT * FROM EMP_st ORDER BY EMP ID ASC
- Above query will sort the EMP ID column by Ascending order.
- All other columns such as EMP Name & EMP status will be sorted based on Column EMP ID.
- Output will be as below.
Output:
| EMP ID | EMP Name | EMP Status |
| 151512 | Sendil | A |
| 151515 | Kamal | A |
| 151520 | Ijaz | A |
| 151521 | Selvi | A |
| 151522 | Selvi | A |
| 151523 | Saravanan | A |
| 151526 | Rani | A |
SELECT * FROM EMP_st ORDER BY EMP ID DESC
- Above query will sort the EMP ID column by Descending order.
- All other columns such as EMP Name & EMP status will be sorted based on Column EMP ID.
- The output will be as below.
Output:
| EMP ID | EMP Name | EMP Status |
| 151526 | Rani | A |
| 151523 | Saravanan | A |
| 151522 | Selvi | A |
| 151521 | Selvi | A |
| 151520 | Ijaz | A |
| 151515 | Kamal | A |
| 151512 | Sendil | A |
SELECT * FROM EMP_st ORDER BY EMP ID ASC
SQL – Select TOP Command
- Select top comments is used to select the number of rows from the table based on the condition specified in the comment
- Select top comment can be used to select:
- A specific number of Rows.
- Percentage of rows from the table.
- Rows with the condition.
Syntax:
The syntax will be varied based on the requirement.
- A specific number of Rows
SELECT TOP number column_name(s)
FROM table_name;
- Percentage of rows from the table
SELECT TOP number column_name(s)
FROM table_name;
- Rows with condition
SELECT TOP number column_name(s)
FROM table_name;
WHERE condition;
Description:
- Selecting Top/Percentage of rows will give the output with specified number of rows
- Conditions can be given for the specified number of rows
- Top row comment can be written in two ways one with top and another one with Limit.
Sample:
Below is the table we going to use for Top comment
EMP_CNTRY:
| Name | City |
| Ram | Delhi |
| Sam | Tamil Nadu |
| Srini | Delhi |
| Naresh | Kerala |
Scenario 1: (Select by TOP)
SELECT TOP 3 * FROM EMP_CNTRY;
(OR)
SELECT * FROM Customers
LIMIT 3;
- Both queries will give same output
- Above query will select top 3 row from the table
- And the output will be shown as below
| Name | City |
| Ram | Delhi |
| Sam | Tamil Nadu |
| Srini | Delhi |
Scenario 2: (Select by Percentage)
SELECT TOP 50 PERCENT * FROM EMP_CNTRY;
- The above query will take the percentage of entire table and give the output.
- The output will be as below.
| Name | City |
| Ram | Delhi |
| Sam | Tamil Nadu |
Scenario 3: (Select with Condition)
SELECT * FROM EMP_CNTRY
WHERE City =’Delhi’
LIMIT 2;
- The above query will take will execute the condition first and then it will pop up the first 3 rows.
- The output will be as below.
| Name | City |
| Ram | Delhi |
| Srini | Delhi |
Explanation of MERGE Statement in SQL:
As we discussed before about the MERGE statement in SQL is combination of INSERT, UPDATE and DELETE statements. By using this we can perform all these operations in target table with help of source table data.
Using that, first it will check the matched values from source table, if the value has been matched, then it will perform the operations what we mentioned inside the query, if not matched then it will insert the unmatched record from source table to target table.
Examples:
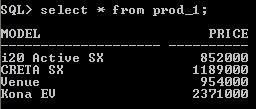
Here we use prod_1 table as source table and prod_2 table as target table. The below example uses prod_2 (target) table to modify the data by getting the data from prod_1 (source) table. Based on the model column’s data from both the tables, it can check the price column’s data from source table to target table.
Source table: PROD_1
Target table: PROD_2

It will update the data in price column when the data from model column is matched with source table (PROD_1). Otherwise it will insert the record in target table (PROD_2) when the data not available in source table (PROD_1). Delete operation can perform like if the data not available in source table (PROD_1) when the data available in target table (PROD_2), that data can be deleted by using delete statement where I mentioned inside the query.
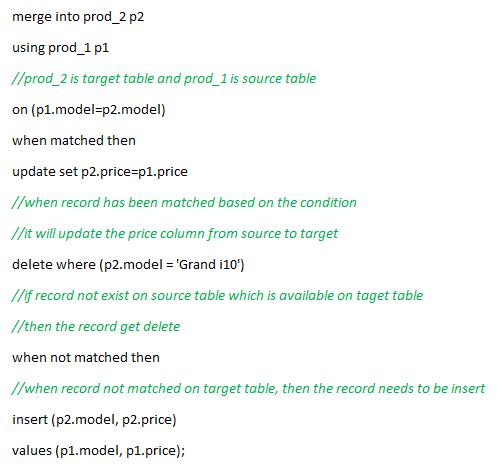
After execution of this query, the price column has been updated in target table using source table data.
RESULT:

This is how we use MERGE statement in SQL. Above I specified the output of the above MERGE statement.
SQL Merge Statement
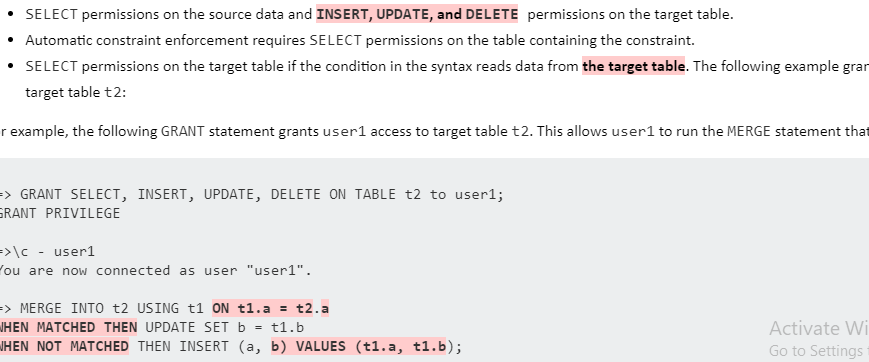
Using MERGE statement, we can perform operations like INSERT, UPDATE and DELETE together which is the easiest way to handle the large database and also we need DML(data manipulation privileges) on the target table to execute merge operations.
In simple words, we can update, insert and delete a row conditionally into a table, thus avoiding multiple UPDATE statements. In other words, MERGE Statement in SQL normally merges data from a source record to a target record based on the given condition. The Syntax of the merge statement look differ when compare with other SQL statements.
Consider we have tables like source and target, in that we want to make change in target table with help of source table which consist of updated records. It check the target table from source table like below,
UPDATE:
If the data (used in MERGE condition) from source table is matched with the data from target table, but other than the column is not matched, that columns will be updated from source table to target table.
INSERT:
If the data from source table is not matched with the data from target table, that record will be inserted from source table to target table.
DELETE:
If the data from target table which is not available in source table, that record will be deleted from target table. It means when data not available in source table.
Now we can understand the procedure of MERGE Statement, when to use INSERT, UPDATE and DELETE inside the MERGE statement.
In the Syntax:
USING Clause – specifies the source table where you want to identify the data
ON Clause – specifies the condition between two tables
INTO Clause – specifies the target table where you are updating or inserting or deleting
WHEN MATCHED
WHEN NOT MATCHED – instruct the SQL server how to perform the results of the join condition
MERGE Statement syntax :
Merge target_table t1
// t1 is alias name for target table
using source_table t2
// t2 is alias name for source table
on (t1.a=t2.a)
//fix condition to matching the source column (a) and target column (a)
when matched then
//if the column has been matched proceed the following condition
update set t2.a=t1.a
when not matched by t1 then
//if the column of target table not matched, then proceed the following condition
insert (t2.a, t2.b) values (t1.a, t1.b)
when not matched by t2 then
//if the column of source table not available, then proceed the following condition
delete;
USING Clause in SQL
Using clause is specifies a column name which is matched in two tables when performing join operation. It is used in EQUI JOIN where we mentioned it as join condition instead of using ON Clause.
- If we use USING Clause in NATURAL join, that kind of join modified as EQUI Because Using Clause and NATURAL Join are mutually exclusive.
- It should not have alias name or table name in specified column.
- In USING Clause we use only one column to match the record even more than one column matched.
Examples:
The following base tables are used to perform the above join conditions with use of USING Clause.
Example 1:
Table name: t_employees
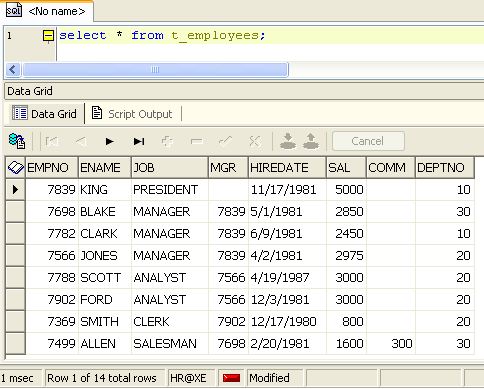
Table name: t_departments

Requirement 1: Write a query to find department name and location of all employees.
select * from t_employees e join t_departments d using (deptno);
Output:
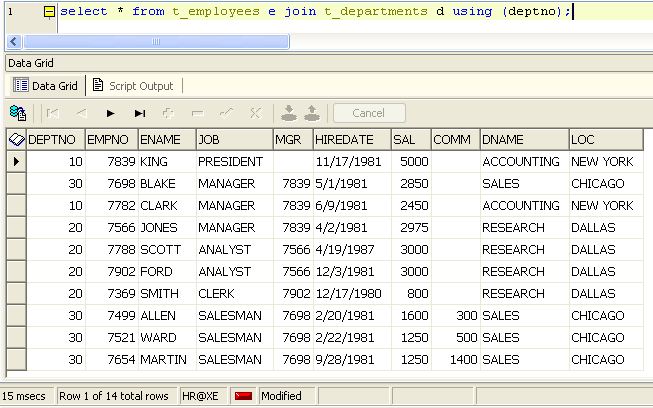
Explanations:
In above example we use USING Clause in DEPTNO column from T_EMPLOYEES and T_DEPARTMENTS to find all employees with their respective department name (DNAME) and locations (LOC).
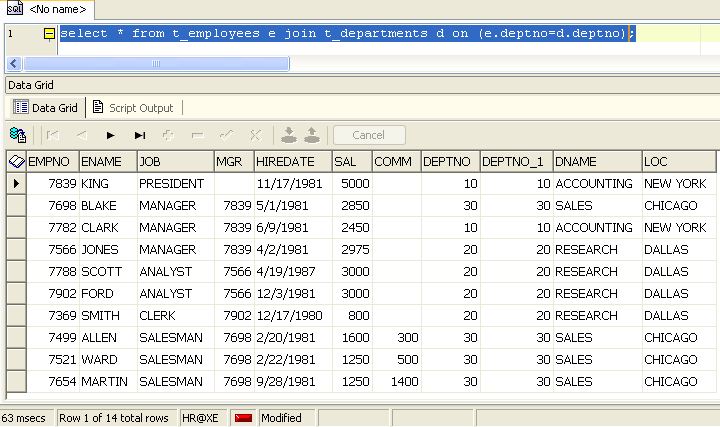
We can see the same output while using ON Clause instead of USING Clause. But here we need to mention the equality between two tables.
Alternate Query:
select * from t_employees e join t_departments d on (e.deptno=d.deptno);
Output:
Example 2:
Table Name: t_players
Table Name: t_teams
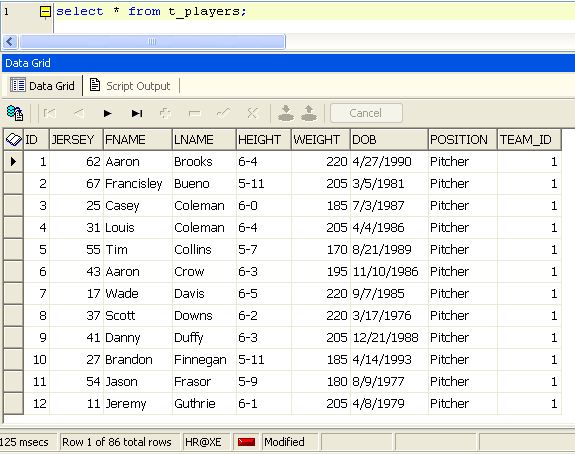
Table Name: t_teams
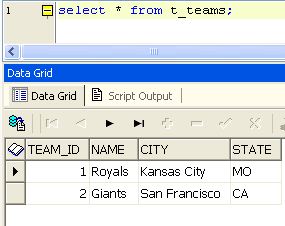
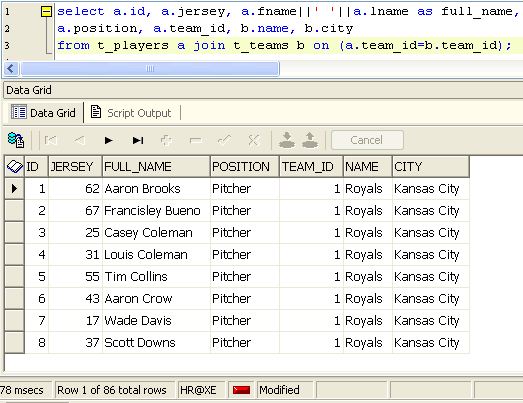
Requirement 2: Write a query to find players id, jersey id, full_name, position and their respective team name and their city.
select a.id, a.jersey, a.fname||' '||a.lname as full_name,
a.position, team_id, b.name, b.city
from t_players a join t_teams b using (team_id);
Output:
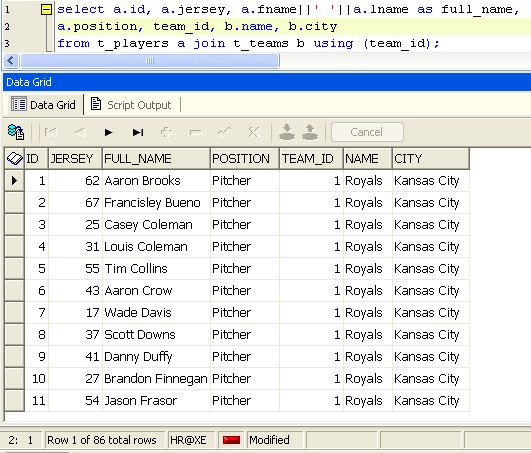
Explanation:
In above example we use USING Clause in TEAM_ID column from T_PLAYERS and T_TEAMS to find all players with their respective team name (NAME) and City name (CITY).
We can see the same output while using ON Clause instead of USING Clause. But here we need to mention the equality between two tables.
Requirement 3: SQL Query to find Second Highest Salary
This query is using to find the 2nd highest Salary in the data set of elements in the data base which Can be determined in the some data sets are using o find the largest salary details using the table employees.
Consider a sample table for finding the 2nd highest salary on the given set of table
| EMP_NAME | EMP_SALARY |
| AMU | 15000 |
| RAJU | 1789654 |
| GOPU | 12000 |
| MALANI | 17896 |
Syntax:
In the below syntax clearly understanding how we implemented the query to find out the 2nd highest salary
SELECT name, possible (income) as salary FROM employer
WHERE
We can also the query called nest to finding the highest salary
SELECT name, possible (income) AS income
FROM employees
WHERE income < (SELECT possible (income)
FROM employer);
Sample data – sql query
Alternate way how we can also find out the largest salary in the set of data given below
SELECT name, possible (income) AS income
FROM employer
WHERE income IN
(SELECT income FROM employer MINUS SELECT possible (income)
FROM employer);
SELECT name, possible(income) AS income
FROM employer
WHERE income (SELECT possible(income)
FROM employer);
Resultant:
| EMP_NAME | EMP_INCOME |
| RAJU | 1789654 |
Alternate Query:
select a.id, a.jersey, a.fname||’ ‘||a.lname as full_name,
a.position, a.team_id, b.name, b.city
from t_players a join t_teams b on (a.team_id=b.team_id);
Output:
Group by Clause in SQL
- Is is a SQL Command is used to group the data from the table
- It is used in Select statement
- By One word about “Group by Clause” is Summarizing Data from the Data Base
GENERAL SYNTAX:
SELECT
FROM
WHERE
GROUP BY
HAVING
ORDER BY
Syntax for group by in a statement
SELECT coloumn_name, functions (coloumn_name)
FROM table_name
WHERE condition
GROUP BY coloumn_name
| Roll Number | Name | Age | Height | Weight |
| 101 | Abi | 21 | 162 | 62 |
| 102 | Bharani | 20 | 172 | 68 |
| 103 | Chandhan | 19 | 156 | 48 |
| 104 | Dhanush | 19 | 165 | 68 |
| 105 | Epsipa | 21 | 156 | 42 |
Hence we get the result like below
SELECT Roll Number,Name
FROM Students GROUP By Weight
Result
It will Display Those who are all having same wait that will be shown with their name and Roll No
| Roll Number | Name |
| 101 | Abi |
| 102 | Bharani |
| 104 | Dhanush |
| 105 | Epsipa |
Grouping and aggregate Functions
If we need no of Aggregate Same age people
SELECT ‘Age’, COUNT(‘membership number) FROM ‘students’ GROUP BY ‘Age’:
By executing the above command in MySQL it will gives the Result.
| Age | COUNT(‘membership number’) |
| 21 | 2 |
| 20 | 1 |
| 19 | 2 |
| 23 | 1 |
Group by in a Statement with Where clause
Considered the below table:
| Roll Number | Name | Age | Height | Weight |
| 101 | Abi | 21 | 162 | 62 |
| 102 | Bharani | 20 | 172 | 68 |
| 103 | Chandhan | 19 | 156 | 48 |
| 104 | Dhanush | 24 | 165 | 68 |
| 105 | Epsipa | 21 | 156 | 42 |
Query :
list out the Students Name with Hight those who are having above 20years
Syntax
SELECT name, Hight
FROM students
WHERE age>20
Group by Hight
Result:
| Roll Number | Name | Height |
| 101 | Abi | 162 |
| 104 | Dhanush | 165 |
| 105 | Epsipa | 156 |
SELECT coloun1,coloumn2
FROM table1,table2
WHERE [conditions] GROUP BY coloumn1, column 2
HAVING [conditions] ORDER BY coloumn1, coloumn2
Examle:
Let consider the table
| EMP ID | EMP NAME | AGE | LOCATION | SALARY |
| 1 | KUMAR | 32 | CHENNAI | 2000.00 |
| 2 | MAHESH | 25 | BANGALORE | 1500.00 |
| 3 | SNEHA | 23 | KOLKATTA | 2000.00 |
| 4 | RITHESH | 27 | RAJESTHAN | 3850.00 |
| 5 | KIRAN | 32 | PUNE | 20000.00 |
QUERY:
Shows the result age count equal to 2 or more than that
SELECT EMP ID,EMP_NAME,AGE,LOCATION,SALARY
FROM CUSTOMERS
GROUP BY age
HAVING COUNT (age) >=2;
Output:
| EMP ID | EMP NAME | AGE | LOCATION | SALARY |
| 1 | KUMAR | 32 | CHENNAI | 2000.00 |
| 5 | KIRAN | 32 | PUNE | 20000.00 |
SQL Union Clause
The Union Clause is used to join two separate select presentations and produce the result set as a relationship of both the select verbalizations.
- The fields to be used in both the select verbalizations must be in the same mentioning, same number, and same data type.
- The Union revelation produces clear characteristics in the resulting Set, to get the duplicate regards too UNION ALL must be used rather than basically UNION.

SQL Union Clause Basic Syntax
Select * from column_name(s) & tablename1 UNION Select * column_name(s) FROM tablename2; Resultant set consists of distinct values.
Select * from column_name(s) & tablename1 UNION ALL Select * from column_name(s) & tablename2;
Employee
| Eid | EM Name | EM Address | EM Phone | Age |
| 101 | Mani | Mumbai | xxxxxxxxxx | 26 |
| 102 | Ram | Chennai | xxxxxxxxxx | 35 |
| 103 | Suresh | Salem | xxxxxxxxxx | 28 |
| 104 | Aijay | Delhi | xxxxxxxxxx | 40 |
| 103 | Raj | Pune | xxxxxxxxxx | 25 |
| 102 | Kumar | Gurgon | xxxxxxxxxx | 48 |
| Emid | Working | Grade |
| 101 | IT | O |
| 102 | Mechanical | E |
| 103 | Civl | A |
| 104 | Electronics | D |
To fetch different Emid from Employee and Employee_Details table.
Select * Emid FROM Employee UNION Select Emid FROM Employee_Details;
Output:
Emid
101
102
103
104
To fetch Emid of Employee and Employee_Details table and including duplicate values. Select * Emid FROM Employee UNION ALL Select Emid FROM Employee_Details;
Output:
Emid
101
102
103
104
103
102
To fetch Emid, EMNAME from the Employee table WHERE Emid is greater than 3 and Emid, Work from Employee_Details table WHERE Emid is less than 3, including duplicate values also definitely filing the data by Emid.
Example
Select * Emid, EM-NAME FROM Employee WHERE Emid>3
UNION ALL
Select * Emid, Work FROM Employee_Details WHERE Emid<3
ORDER BY 1;
The column signs in both those select declarations can infer autonomously save the data type must be that comparable. Additionally, in this result set the sign of the segment done in this at first select announcement will appear.
| 101 | IT |
| 102 | Mechanical |
| 104 | Aijay |
SQL INTERSECT & MINUS CLAUSE
INTERSECT CLAUSE:
The INTERSECT operator is used between two SELECT Statements. It displays the common values from both queries, eliminating duplicate rows and displays data in ascending order. The column which used in the two queries should contain same kind of datatype.
Syntax:
Select column1, column2 from table1
INTERSECT
Select column1, column2 from table2;
Here the datatype of column1 and column2 from table1 should match with the datatype of column1 and column2 from table2.
Example:
Table 1: Students
It contain information about the students which their course_id

Table 2: Courses
It contain information about course with their course_id

Query:
The below query is used to fetch the information about whoever studying both SQL and PLSQL course.
select sid, sname from
(select s.stud_id as sid, s.stud_name as sname, s.course_id as cid, c.course_name as cname from students s, courses c where s.course_id=c.course_id)where cid=10
intersect
select sid, sname from
(select s.stud_id as sid, s.stud_name as sname, s.course_id as cid, c.course_name as cname from students s, courses c where s.course_id=c.course_id)where cid=20;

MINUS CLAUSE
The SQL MINUS Clause/Operator is used to return the rows from 1st select statement that is not available in 2nd statement. It means 1st select statement ignore some record whichever available in 2nd statement. It is opposite to INTERSECT Clause, which shows common records from both queries. But here doesn’t show the common records.
Syntax:
Select column1, column2 from table1
MINUS
Select column1, column2 from table2;
Here the datatype of column1 and column2 from table1 should match with the datatype of column1 and column2 from table2.
Example:
Table 1: Students
It contain information about the students which their course_id
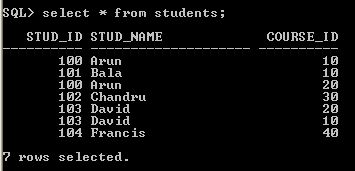
Table 2: Courses
It contain information about course with their course_id
Query:
The below query is used to fetch the information about whoever not studying SQL course.
select stud_id, stud_na
me from students
minus
select sid, sname from (select s.stud_id as sid,
s.stud_name as sname, c.course_id, c.course_name as cname
from students s, courses c where s.course_id=c.course_id)
where cname=’SQL’;

SQL View
View:
View is the imaginary table or virtual record set. It contains data at run time only not created in database. The results of using view are not permanently stored in database. View can use in functions, joins and where clause.
- The view will not accept the parameters.
- The view should be a single select query.
The view can UPDATE, DELETE, INSERT the table based on the same scenario which is called updatable view. We will discuss late
Different Ways to Use VIEW:
- Select * from viewname
- Select * from studenmark (Nolock) SM inner join view name VNon VN.sid=SM.sid
Create View:
In SQL a view is a virtual table dependent on the outcome set of a SQL proclamation.
A view contains lines and sections much the same as a genuine table. The fields in a view are fields from at least one genuine tables in the database.
The below-creating view for the student table who is having greater then 18 years
The syntax for Create View:
Syntax-1
Create VIEW view_name AS
SELECT column1, column2,
FROM table_name
WHERE condition;
Syntax-2
CREATE VIEW view_name as select column1, column2…where condition
Example for Create View:
Example-1
CREATE VIEW myViewDemo as
Select id,name from students where stdage>18
Example -2:
The following SQL creates a view that demonstrates all clients from Bangalore:
Create VIEW [Bangalore Customers] AS
SELECT CustomerName, ContactName
FROM Customers
WHERE Country = ” Bangalore “;
SELECT * FROM [Bangalore Customers];
The Following SQL create a view that chooses each item in the “Items” table with a cost higher than the normal cost
Example -3:
Create VIEW [Products Above Average Price] AS
SELECT ProductName, Price
FROM Products
WHERE Price > (SELECT AVG(Price) FROM Products);
We can question the view above as pursues
SELECT * FROM [Products Above Average Price];
Updating View
A view can be refreshed with the CREATE OR REPLACE VIEW direction.
The below SQL view for updating the student table who is having greater than 18 years and less than 50 years
Syntax for Update View:
Syntax-1:
SQL CREATE OR REPLACE VIEW Syntax
Make OR REPLACE VIEW view_name AS
SELECT column1, column2,
FROM table_name
WHERE condition;
Syntax-2:
CREATE OR REPLACE VIEW view_name as select column1, column2…where condition
Example for Update View:
Example-1:
CREATE OR REPLACE VIEW myViewDemo as
Select * from students where stdage>18
Example-2:
The Following SQL includes the “City” segment to the “Bangalore Customers”
Model
Make OR REPLACE VIEW [Brazil Customers] AS
SELECT CustomerName, ContactName, City
FROM Customers
WHERE Country = “Bangalore”;
Deleting View:
A view is erased with the DROP VIEW direction. The view is deleted with the command of DROP.
The syntax for Drop View:
DROP VIEW view_name
Example for Update View:
The Following SQL drops the “Bangalore Customers”
Example-1:
DROP VIEW [Bangalore Customers];
Example-2:
DROP VIEW myViewDemo as
Updatable Views:
- The updatable view can use insert, update, delete based on some rules are
- The view must reference the columns from only one table.
- Should not have the aggregate function
- (AVG,COUNT,SUM,MIN,MAX)
- Top command is should not have.
Mandatory rules for updating the view:
The view should not have the below
GROUP BY
ORDER BY
DISTINCT
subquery,
join (Means multiple tables),
all, not null values.
With Checkbox Option:
If we create the view using where condition the full table of data will not available in the view. We will get the partial data of the table however a simple view is can updatable whereas it is possible to update the data which is not visible via view when can use the command WITH CHECK OPTION. It will refer only to fetching via view data.
Example:
CREATE OR REPLACE VIEW myViewDemo
As Select * from students where stdage>18 WITH CHECK OPTION
Explanation:
If we didn’t use the WITH CHECK OPTION it may happen to (insert, update, delete) less than 18 years students.
SQL Alias
- Expected names are the passing names given to table or section with a definitive target of a specific SQL question. It is utilized when the name of part or table is utilized other than their novel names, in any case, that adjusted name is just
- Pseudonyms made to make table or zone names persistently
- The renaming is only a dupe and table name does not change in the primary
- False names are valuable when table or area names are tremendous or not so much
- These are favored when there is more than one table associated with a solicitation.
Syntax
Select column as alias_name FROM table_name; column: finds the table name
alias_name: Alias name is to use to the temporary replacement of the original column name table_name: to find the table name
For Alias Table Name
Select the Column from the table_name as the alias name Column: fields the data from the table table_name: find the name of the table_name
alias_name: alias table name temporary replacement the table_name
|
Student_Details |
||
| Student Roll No | Student Branch Name | Student Grade |
| 1 | IT | o |
| 2 | ECE | A |
| 3 | MECH | o |
| 4 | EEE | B |
| 5 | CSE | o |
| 6 | Arch | C |
Queries for determining column alias
To get ROLL_NO from Student table_name using CODE being that alias_name. Select the Roll_No as OfFrom Student_details
Output
1
2
3
4
5
6
To get Branch using Stream as alias name also Grade as CGPA of table Student_Details.
| 1 | IT | o |
| 2 | ECE | A |
| 3 | MECH | o |
| 4 | EEE | B |
| 5 | CSE | o |
| 6 | Arch | C |
| Roll.no | Name | Address | PhoneNumber | Age |
| 101 | Rohit | Chennai | xx xxxxxxx | 20 |
| 102 | kamal | Mumbai | xxxxxxxxxx | 18 |
| 103 | Pradeep | Pune | xxxxxxxxxxx | 21 |
| 104 | Rahul | Vellore | xxxxxxxxxx | 18 |
SELECT s.NAME, d.roll FROM Student AS s, Student_Details
AS d WHERE s.Age=20 AND s.ROLL_NO=d.ROLL_NO;
Output:
| NAME | Grade |
| Kamal | A |
SQL Fetch and offset:
Offset and FETCH Clause are used identified with SELECT and ORDER BY stipulation to give an approach to recoup an extent of records.
Bring course is used to return interested number or segments or we can reestablish some degree of whole records and it is used with solicitation by stipulation and not used with itself.
Syntax:
SELECT column_name(R)
FROM table1_name
ORDER BY column1_name
OFFSET rows1_to_skip
FETCH NEXT number_of_rows1 ROWS ONLY;
Example:
Consider that the following Employee table
| First Name | Last Name | Employee id | Employee Salary | Super-Employeeid |
| Ashok | kumar | 677368 | 25000 | 85662266 |
| Babu | kannan | 677369 | 30000 | 563333334 |
| Raju | murugan | 677370 | 90000 | 789654625 |
| Arul | raj | 677371 | 45000 | 566355553 |
| Mohamed | imran | 677372 | 60000 | 866663663 |
| Velu | samy | 677373 | 40000 | 8665225666 |
| Muthu | vel | 677374 | 20000 | 8966775666 |
SELECT Firstname, Lastname
FROM Employeeid
ORDER BY EmployeeSalary
OFFSET 2 ROWS
FETCH NEXT 4 ROWS ONLY;
Output:
| First Name | Last |
| Ashok | Kumar |
| Arul | Raj |
| Babu | Kannan |
| Mohamed | imran |
Print 2 employeeid details who are at the bottom of the table.
SELECT Firstname, Lastname
FROM Employeeid
ORDER BY EmpoloyeeSalary
OFFSET (SELECT COUNT(*) FROM EMPLOYEE) – 2 ROWS FETCH NEXT 2 ROWS;
Output:
| First Name | Lastname |
| Mohamed | Imran |
| Raja | murugan |
OFEST:
The OFFSET contention is utilized to recognize the beginning stage to return lines from an outcome set. Fundamentally, it bar the principal set of precedent.
Note :
- OFFSET must be utilized with ORDER BY condition. It can’t be utilized without anyone
- OFFSET worth must be more noteworthy than or equivalent to zero. It can’t be negative, else return
Syntax:
SELECT column_name(s)
FROM tables_name WHERE condition
ORDER BY column_name
OFFSET rows_to_skip ROWS;
Example 1:
Print Firstname, Lastname of all the Employee except the employee having lowest salary.
SELECT Firstname, Lastname
FROM Employeeid
ORDER BY EmployeeSalary
OFFSET 1 ROWS;
Output:
| First Name | Lastname |
| Muthu | vel |
| Velu | samy |
| Mohamed | Imran |
| Arul | Raj |
SQL Date Functions
While working with a database, the configuration of the date in the table must be coordinated with the information date so as to embed. In different situations rather than date, datetime (time is likewise engaged with date) is utilized.
Sysdate :
It returns servers subtleties like date and time. When working with any database, the date format in the table should be matched along with the user data(input data) to insert it to the table. To achieve that some of the date function will be used are listed below.
Below are the date functions that are used in SQL:
- LOCALTIME(): It will return the today’s date and time.
Syntax: SELECT LOCALTIME() FROM DUAL;
Output: 2019-02-19 02:56:42
- LOCALTIMESTAMP(): It will returns the todays date and time.
Syntax: SELECT LOCALTIMESTAMP() FROM DUAL;
Output: 2019-02-19 02:56:48
- ADDDATE(): It will returns a date after a certain date interval added to the given data.
Syntax: SELECT ADDDATE(“2012-02-19 02:30:47”, “5”) FROM DUAL;
Output: 2012-02-19 02:30:52
- ADDTIME(): It will returns a date time after certain time interval has been added.
Syntax: SELECT ADDTIME(“2017-12-15 09:34:21”, “2”) FROM DUAL;
Output: 2017-12-15 09:34:23
- CURDATE(): It will returns the todays date.
Syntax: SELECT CURDATE()FROM DUAL;
Output: 2019-02-19
- CURRENT_DATE(): Its returns the todays date with out time.
Syntax: SELECT CURRENT_DATE() FROM DUAL;
Output: 2019-02-19
- CURRENT_TIME(): It will returns the current time with out any date
Syntax: SELECT CURRENT_TIME() FROM DUAL;
Output: 02:53:15
- CURRENT_TIMESTAMP(): It will returns the todays date and time.
Syntax: SELECT CURRENT_TIMESTAMP() FROM DUAL;
Output: 2019-02-19 02:53:21
- CURTIME(): It will returns the current time.
Syntax: SELECT CURTIME() FROM DUAL;
Output: 02:53:28
- MAKETIME(): It will returns the time for a certain hour, minute, second combination.
Syntax: SELECT MAKETIME(01, 56, 4) FROM DUAL;
Output: 01:56:04
- DATE_ADD(): It will returns a date after a certain date interval has been added.
Syntax: SELECT DATE_ADD(“2019-02-19”, INTERVAL 10 DAY) FROM DUAL;
Output: 2019-02-19
- DATE_FORMAT(): It will formats a date as specified by a format mask.
Syntax: SELECT DATE_FORMAT(“2019-12-15”, “%Y”) FROM DUAL;
Output: 2019
- DAY(): It will returns the day portion of a date value.
Syntax: SELECT DAY(“2019-02-19”) FROM DUAL;
Output: 16
- DAYNAME(): It will returns the weekday name for a date.
Syntax: SELECT DAYNAME(‘2008-05-15’) FROM DUAL;
Output: Thursday
- DATE(): It will extracts the date value from the date or date time expression.
Syntax: SELECT DATE(“2017-12-15”) FROM DUAL;
Output: 2017-12-15
- DATEDIFF(): It will returns the difference in days between two date values.
Syntax: SELECT DATEDIFF(“2017-12-25”, “2017-12-15”) FROM DUAL;
Output: 10
- EXTRACT(): It will extracts parts from a date.
Syntax: SELECT EXTRACT(MONTH FROM “2019-02-19”) FROM DUAL;
Output: 7
- HOUR(): It will returns the hour portion of a date value.
Syntax: SELECT HOUR(“2019-02-19 09:34:00”) FROM DUAL;
Output: 9
- LAST_DAY(): It will returns the last day of the month for a given date.
Syntax: SELECT LAST_DAY(‘2019-02-19’) FROM DUAL;
Output: 2019-02-31
- DAYOFMONTH(): It will returns the day portion of a date value.
Syntax: SELECT DAYOFMONTH(‘2019-02-19’) FROM DUAL;
Output: 16
- DAYWEEK(): It will returns the weekday index for a date value.
Syntax: SELECT WEEKDAY(“2019-02-19”) FROM DUAL;
Output: 0
- DAYOFYEAR(): will It returns the day of the year for a date value.
Syntax: SELECT DAYOFYEAR(“2019-02-19”) FROM DUAL;
Output: 197
SQL Character Function:
Character functions used to accept input data or Colum from a table and apply different transformation to the data which will be resulted in string or number as output.
- LOWER: Used to converts alpha character values to lowercase. Also, it will not convert any special characters like $, % etc.
Syntax: LOWER ()
Input: SELECT LOWER(‘BESANT’) FROM DUAL;
Output: besant
- UPPER Used to converts alpha character values to uppercase. Also it will not convert any special characters like $,% etc
Syntax: UPPER()
Input: SELECT UPPER(‘besant’) FROM DUAL;
Output: BESANT
- INITCAP: Used to converts alpha character values to upper case for each first character.
Syntax: INITCAP()
Input: SELECT INITCAP(‘besant tech’) FROM DUAL;
Output: Besant Tech
- CONCAT: used to merge to string into one. Example “abc” & “def”will be merge like “abcdef”
CONCAT(‘Str1’, ‘Str2’)
Input: SELECT CONCAT(‘besant’ ,’tech’) FROM DUAL;
Output: besanttech
- LENGTH: used to find the length of the data.
Syntax: LENGTH(Column)
Input: SELECT LENGTH(‘Lteching Is Fun’) FROM DUAL;
Output: 15
- SUBSTR: used to return a part of a string from a given starting position.
Syntax: SUBSTR (‘String’, index, length of string to extract)
Input: SELECT SUBSTR(‘Database Management System’, 9,7) FROM DUAL;
Output: Managem
- LPAD and RPAD:used to return the str with data appended left or right of giving string
Syntax: LPAD(Column, n, ‘String’)
Syntax: RPAD(Column, n, ‘String’)
Input: SELECT LPAD(‘500′,5,’#’) FROM DUAL;
Output: ##500
Input: SELECT RPAD(‘10000′,7,’#’) FROM DUAL;
Output: 10000##
- TRIM: Used to trim the leading or trailing or both the spaces of a given string or column.
Syntax: TRIM(Lead|Trail|Both, trim_char FROM source)
Input: SELECT TRIM(‘ besant ‘) FROM DUAL;
Output: besant
- REPLACE: Used to replace a string in a given string. Example: If you want to replace a word “NEW” with another word “Besant” then we can use this function to achieve so.
Syntax: REPLACE(Text, search_str, replace_str)
Input: SELECT REPLACE(‘NEW TECH’, ‘NEW’,’BESANT’) FROM DUAL;
Output: BESANT TECH
Input: SELECT REPLACE(‘abcefabcaaabbbcccabcd’, ‘abc’) FROM DUAL;
Output: efaaabbbcccd
SQL Conditional Expressions
There is 2 type of oracle SQL conditional expression we have.
- CASE
- DECODE
CASE:-
This function is used to decode the values
- Oracle 8.0 introduces the case statement whereas oracle 8i introduces the case conditional statement.
- Case conditional statement is also called a searched case statement.
- Case statement performance is very high compared to the decode function.
Note:- Decode conversion function internally uses equality operator were as case statements we can use all sql operator explicitly
- CASE Expression: works in the concept of IF-THEN-ELSE statements. When the expression in true is true it returns the then expression.
Syntax:
CASE expr WHEN expr1 THEN return_expression1
[WHEN expr2 THEN return_expression2
WHEN exprn THEN return_expressionn
ELSE else_expr]
END
Example:
Input:
SELEC
CASE 50 WHEN 50 THEN 1.5*500
WHEN 12 THEN 2.0*500
ELSE 500
END “COLUMN”
FROM DUAL;
Output : 750
- The DECODE Function: it is similar to case statement. works in the concept of IF-THEN-ELSE statements. When the expression in true is true it returns the then expression.
Syntax: DECODE( expression , search1 , result1 [, search2 , result2]… [, default] )
Input :
SELECT DECODE(50, 50, 1.5*500, , 12, 2.0*500,
500) AS “COLUMN NAME”
FROM DUAL;
Output : 75
- GREATEST: Return the largest ASCII value from given list of value/expression
Syntax:
GREATEST(expr1, expr2 [, …..] )
Input: SELECT GREATEST(‘ABC’, ‘abc’) from dual;
Output:
GREATEST(‘ABC’, ‘abc’)
ABC
IFNULL: If expression1 is not NULL, returns expression1; otherwise it returns expression
Syntax: IFNULL(expr1, expr2)
Input: SELECT IFNULL(1,0) FROM dual;
Output: 1
Input: SELECT IFNULL(NULL,10) FROM dual;
Output: 10
- IN:Is used in where condition to check any one of the value is present in given list of values..
Syntax: WHERE column IN (x1, x2, x3 [,……] )
Input: SELECT * FROM TABLE WHERE ID IN(50, 12);
Output: IN(50,20)
- LEAST: Return the smallest ASCII value from given list of value/expression.
Syntax: LEAST(expr1, expr2 [, ……])
Input: SELECT LEAST(‘ABC’, ‘abc’)from dual;
Output:
LEAST(‘ABC’, ‘abc’)
ABC
Input: SELECT LEAST(‘ABC’, null, ‘abc’) from dual;
Output: LEAST(‘ABC’, null, ‘abc’)
- NULLIF: Returns as a ll value if the e of 1=2, otherwise it returns as value1.
Syntax:NULLIF(1, 2)
Example:
Input: SELECT NULLIF(1122334455, 1122334455) from dual;
Output: NULL
SQL Injection:
SQL injection technique is used to exploit user information via web forms inputs by injecting SQL code as parameter. These data will be further used for manipulate user details or hacking their accounts.
- SQL injection technique is a code injection that might delete your database.
- SQL injection technique is a web hacking technique.
- SQL injection technique is a malicious code in SQL statements.
Web servers communicate with database when they need to retrieve or insert data into database. Attacker’s SQL Statements are designed in the manner to executed while the web-server is fetching data from the application server
SQL Injection Example
Suppose we have an app based on employee records. Any employee can view only his or her own records by entering a unique employee ID
Employee id:
And the employee enters the following in the input field:
568483 or 1=1.
So, this basically translates to:
select * from employee where emp_id = 568483 or 1 = 1
Now this 1=1 will remains true without filter any data. Now the hacker has more chance to delete these records from database in similar manner.
Following SQL Statement.
Select * from USER_TABLE where UNAME = “” and PWORD=””
Now the malicious can use the ‘=’ operator to fetch private and secure user details like passwords, Username etc. So instead of the above query the following query when executed, it fetches all the protected data, which are not intended to be shown to the end users.
Select * from USER_TABLE where (UNAME = “” or 1=1) AND (PWORD=”” or 1=1).
SQL Injection Impact
The hacker can fetch all the user details from in the database, such as credit card numbers, Aadhar Card numbers and can also got access to user’s administrator portal. Also, possible to delete the data from the tables.
How to Prevent an SQL Injection
- The way to prevent SQL Injection attacks is the validating input and parametrized queries.
- The application should never use the input directly. The developer must be clean all input, not only web form the inputs also as login forms.
- Must remove potential malicious code such as a single quotes. And turn off the perceptibility of the database errors on your manufacture sites.
- Database errors an might be used with SQL Injection to extract database information.
Mitigation Of SQL Injection Attack Using Prepared Statements (Parameterized Queries):
We explaining the article using SQL Injection attack an exploiting the vulnerability SQL statements into the fields of data which can be executing the data in the fields and it was developed and implemented the year 1998 and still we use the SQL injection attacks. When it is working attacks with DDOS and XSS and DNS hijacking we can use and access the large no of data sets scales.
We explaining the article using SQL Injection attack an exploiting the vulnerability SQL statements into the fields of data which can be executing the data in the fields and it was developed and implemented the year 1998 and still we use the SQL injection attacks. When it is working attacks with DDOS and XSS and DNS hijacking we can use and access the large no of data sets scales.
TERMINOLOGY:
There are two types of terminology
- validation
- sanitization
Validation: It is nothing a type of validating process for checking the input sets in the given data criteria
Sanitization: It is another type of validating the data sets which can be modifying the inputs that ensure the process is valid and we need to avoid all inputs which can be concatenated in the dynamic data are be sanitized the SQL data to be a correct manner.
Anatomy of an SQL attack:
This can be classified into two types.
- Research
- Attack
Research: These methods are mainly for user-end applications process which can be determined by the view the vulnerable data connected the data with the database.
Attack: It is nothing but the malicious fields that can be using the query morph for its own advantages.
Diagramatic Representation:

SAMPLE DATA – SQL QUERY
Find the following data using the piece code an authentication form but it was done in the JAVA Code
Coding
filter_none
Edit
Play_arrow
Brightness_4
JAVA CODING
String query = “SELECT Emp_Name, Stock FROM the financial record”
+ “WHERE Emp_Name =” + request.getparameter(“Emp_Name “) +
“and pass_word_protect='” + request.getparameter(“Pass_word_protect”) + “‘”;
Try
{
Statement = connection.createstatement();
Resultset rs = statement.executequery(query);
While (rs.next())
{
Page.addtablerow(rs.getstring(“Emp_Name “),
Rs.getfloat(“Estimate”));
}
}
Catch (sqlexception e)
{}
Using SQL Injection attack we can exploit using the user name and password fields can be generating the TRUE or FALSE (Boolean Expressions), this expression can evaluate the either true or false for considering the fields name and password.
Emp_Name = 1’ or ‘1’ = ‘1
Pass_word_protect = 1’ or ‘1’ = ‘1
The SQL statement then becomes
SELECT Emp_Name, estimate
FROM financial statements
WHERE Emp_Name =’1’ OR ‘1’=’1′ and
Pass_word_protect=’1′ OR ‘1’=’1′
Using the above query will returning the value that can be using condition (OR 1=1) is true for every statement. This system can be authenticated user can not know with the credentials (Username and Password)
This statement is proved using the command vulnerability that can be prepared statements mitigated can be parameterized queries can be processed.
RESULTANT:
CODING OUTPUT:
Filter_none
Edit
Play_arrow
Brightness_4
String query = “SELECT Emp_Name, balance “+
“FROM estimated WHERE emp_name = ?
And pass_word_protect = ?”;
Try {
Preparedstatement statement = connection.preparestatement(query);
Statement.setint(1, request.getparameter(“Emp_name”));
Resultset rs = statement.executequery();
While (rs.next())
{
Page.addtablerow(rs.getstring(“username”),
Rs.getfloat(“balance”));
}
} catch (sqlexception e)
{ … }
LISTAGG Functions
LISTAGG function in DBMS is used to aggregate strings from data in columns in a database table and an analytical function used to list all column values into a single row and listed. Introduced in oracle 11 g Release 2, making it very easy to perform string aggregation. Only some of the scenarios where we can use this function.
LISTAGG (measure_expr [, ‘delimiter’]) WITHIN GROUP
(order_by_clause) [OVER query_partition_clause]
measure_expr : The column or expression to concatenate the values.
delimiter : Character in between each measure_expr, which is by default a comma (,)
order_by_clause : Order of the concatenated values
Scenario 1: List all employee names in a single row.
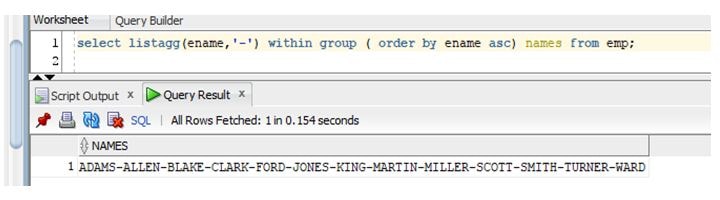
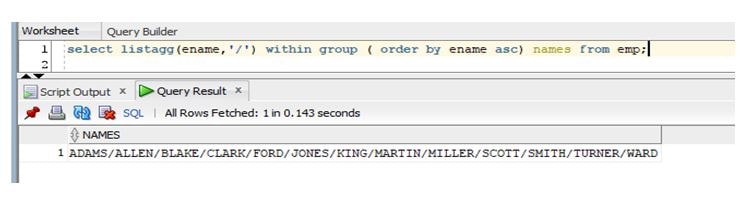
Scenario 2: we can use listagg to reverse a string.

Scenario 3: list all salaries in a single row by groupwise.

NULL Functions in SQL
There are different types of Null Functions is there..,
1) ISNULL():
ISNULL() Is a Function .. which is used to replace NULL Values
SYNTAX:
SELECT colomn(s), ISNULL(coloumn_name, Value-to-replace)
FROM table_name
Example:
Take below table table Name: “Students”
| Name | Marks |
| Kumar | 98 |
| Ramar | NULL |
Syntax Via Example:
SELECT SUM(ISNULL(Marks,35) As Marks
FROM Students;
OutPut
| Marks |
| 133 |
Syntax:
SELECT coloumn(s)
FROM table-name
WHERE ISNULL(coloumn_name);
Example:
Take below table ”table Name: “Students”
| Name | Marks |
| Kumar | 98 |
| Ramar | NULL |
Give the Name of the all Student whose Marks is available in the table (not NULL)
SELECT Name
FROM Students
WHERE ISNULL(Salary);
Output:
| Name |
| Ramar |
2) IFNULL
IFNULL is same like ISNULL the only one condition is first value should not be NULL. It seems like a default constraint to add null value to static value.
Syntax
SELECT Coloumn(s), IFNULL(Coloumn_name, value_to_replace)
FROM table_name
Example
Take below table ”table Name: “Students”
| Name | Marks |
| Kumar | 98 |
| Ramar | NULL |
OutPut
| Marks |
| 133 |
3) COALESCE
This Coalesce Is The Function Which Returns The First Non-Null From The arguments
SELECT coloumn(s), COALESCE(expression_1,… expression_n)
FROM table_name
Example:
Take below table ”table Name: “Students”
| Name | Phone number-1 | Phone number-2 |
| Kumar | 1234567890 | 2345678901 |
| Ramar | NULL | 5689741425 |
SELECT Name, COALESCE (Phone number1,Phone number2) As Student Contact No
From students;
Output
| Name | Student Contact No |
| Kumar | 2345678901 |
| Ramar | 5689741425 |
4) NULLIF
Considers two data here. if two data are equal means it will return NULL Result
Syntax
SELECT Name, NULLIF (Expression1, Expression2)
FROM Table_name;
Example:
Take below table ”table Name: “Students”
| Name | Sub1 | Sub 2 |
| Kumar | 75 | 36 |
| Ramar | 61 | 61 |
SELECT Name, NULLIF(Sub1,Sub2)
From students;
OutPut
| Name | NULLIF(Sub1,Sub2) |
| Kumar | 75 |
| Ramar | NULL |
How to Get the names of the table in SQL
- We are providing the data for the SQL Server or MySQL or Oracle whichever we want easily we can create a table and a database for providing the necessary data to the fields for created database tables.
- In the names of the tables, we are providing the data’s and information’s are using the SCHEMA and TYPE and ALL.
SYNTAX:
SELECT * FROM INFORMATION_SCHEMA.TABLES
WHERE:
INFORMATION_SCHEMA: For providing the database details we can view and retrieves the schemas from the database itself and views can be found in the SQL server instances using the master database details VIEWS/ SYSTEM VIEWS.
sys.tables:
select * from sys.tables
sys.objects:
select * from sys.objects where type = ‘U’
INFORMATION_SCHEMA.TABLES: This schema will allow getting all about the information’s of the schema_tables and views the database details itself.
sys.sysobjects:
select * from sys. sysobjects where type = ‘U’
information_schema.tables:
select * from INFORMATION_SCHEMA.TABLES where TABLE_TYPE = ‘TABLE’
SAMPLE DATA – SQL QUERY
mysql> SELECT table_name FROM information_schema.tables WHERE table_type = ‘base table’ AND table_schema=’test’;
INFORMATION_ TABLE VIEWS:
| TABLE_NAME |
| DEPARTMENT |
| EMPLOYEE |
| ROLE |
| USER |
Four rows in set (0.00 sec)
HOW TO PRINT DUPLICATE ROWS IN A TABLE
Using the query how to print the duplicates in the given set of elements which can similarly like subqueries because repeated data can be going to displaying in the outputs.
Take a set of elements which can be given below for our references.
| S-NAME | S-CLASS |
| RAMU | TENTH |
| RAJU | ELEVENTH |
| SITA | TWELETH |
| MARRY | TENTH |
| RAMU | TENTH |
SELECT S-NAME, S-CLASS FROM table1
GROUP BY -NAME, S-CLASS
HAVING COUNT(*) > 1
There are two different ways we can specifying the data set are given below
simple approach
Best approach: simple approach: this approach are mainly using to count the all the data in the given set of elements in the database and also some repeated duplicates entries are in the database in the given set of elements.
Best approach: Using these approaches are very fastest and quickly we can get the outputs using the keyword GROUP BY and HAVING methods can be used to retrieves the data faster than best approach.
SAMPLE DATA – SQL QUERY
Given a set of elements in the database using the SQL query for displaying the duplicates entries in the given data
| S-NAME | S-CLASS |
| RAMU | EIGHT |
| RAJU | ELEVENTH |
| RITA | NINETH |
| SITA | TWELETH |
| RAVI | FIFTH |
| RAMU | EIGHT |
| SITA | TWELETH |
| RAVI | FIFTH |
| S-NAME |
| RAMU |
| SITA |
| RAVI |
SQL CONSTRAINTS:
Constraints we are used in SQL created and altered the columns, what are all the Columns we Need to use Unique, Primary, and References related to Foreign Keys.
Some Columns need to assign some default constraints For EX: Default (‘ ‘) Empty, Default (0) Numeric Zero, Default(19000101) Date and Time Data Time Data Type Columns, Default (‘Y’), Default (‘N’)
Some columns incase insert Null Reference some select and exec Queries user in projects we will Face Null related Exception that cases to avoid to use
NOT NULL Constraint
CHECK constraint used for some employee-related age restriction we are mostly used, What are all the column we need to restrict while creating the table.That column we are using this constraint.
Above mentioned all Constraints Table Create, Drop, Alter Syntax and Examples:
SYNTAX:
Create Table tablename(Column1 Data type Constraint, Column2 Data type Constraint)
UNIQUE CONSTRAINTS SYNTAX:
Create table Table Name(Column1 Data type Not null Unique)
Or
Create table Table Name(Column1 Data type Not null ,
Unique (Column1))
PRIMARY CONSTRAINTS SYNTAX:
Create table Table Name(Column1 Data type Not null Primary Key)
Or
Create table Table Name(Column1 Data type Not null ,
Primary Key(Column1))
Difference and Definition For unique & primary Key
- Unique and Primary Key Both used columns not allowed Duplicates
- If we are used unique system will allow to delete and insert without Identity ON or OFF
- If We are used primary Key Once we On or OFF identity after that only it will allow to delete and insert this columns
Query to make Identity ON or OFF
SET IDENTITY_INSERT Table name ON
SET IDENTITY_INSERT Table name OFF
NOT NULL & DEFAULT CONSTRAINT SYNTAX:
Create Table table name(Column1 Data type Not Null ,
Column2 Data type Not Null default(‘ ‘),
Column2 Data type Not Null default(0))
CHECK CONSTRAINT SYNTAX:
Create Table table name(Column1 Data type Not Null ,
Check(column1>=Value))
Or
Create Table table name(Column1 Data type Not Null ,
Column2 Data type Not Null default(‘ ‘),
Constraint CHK_Table name Check(cloumn1>=Value and Column2= Value) )
FOREIGN KEY CONSTRAINT SYNTAX:
Create table tablename(column1 data type not null,
Foreign key references table name(column1))
Foreign key reference mostly used source and destination table If we refer some destination table from the source table column, it will not allow deleting referred to table value. 1st need to delete destination table value after that Only will allow base table value.
Example:
Employee master creation, Table Name- Employee, Columns-
Name, Id, DOB, DOJ, Department, Designation, Address, Aadhaar Number, Mobile Number, Left Flag, left Date, Age
Create table employee (empid [int] identity (1,1) Not Null,
Empname [varchar](50) not null default(‘ ‘),
DOB [Smalldatetime ]not null default(‘01/01/1900’),
DOJ [Smalldatetime ]not null default(‘01/01/1900’),
Department[Varchar](50) not null default(‘ ’),
Designation[Varchar](50) not null default(‘ ’),
Address[Varchar](100) not null default(‘ ’),
Aadhaar Number [Varchar](100) not null default(‘ ’),
Mobile Number [Varchar](100) not null default(‘ ’),
Left Flag [Char] (1) not Null default(‘N’),
Left Date [Smalldatetime ]not null default(‘01/01/1900’), Age [int], check(age>=18)
Primary key(empid))
Check Constraints
Check Constraints is used to restrict the values placed in the column. Generally, Check constraints is used in the create table command and alter table command. In the check constraints, we can use the relational operators and list of values. If we try to place the values out of range or not in the list of values, it doesn’t allow to place the value in the column.
We have two option to add check constraints for the particular column. First, at the time of table creation itself, we can add the Check Constraints for the specific column. Second, you can also add the column after the table creation using alter command
Syntax to add check constraints in the Table creation
CREATE TABLE TABLE_NAME(COLUMN1 DATATYPE, COLUMN2 DATATYPE,…, CONSTRAINT CONSTRIANT_NAME CHECK(COLUMN_NAME WITH CONDITION));
Let see an example for creating the table with check constraints
SQL>CREATE TABLE STUDENT(ID INT,NAME VARCHAR2(30),DEPARTMENT VARCHAR2(10),CONSTRAINT CHECK_ID CHECK(ID >45123));
In the above example, table created with the name STUDENT and consists of three columns ID,NAME AND DEPARTMENT. This table contains one check constraints with the name where it check the column ID should always be greater than the value of 45123.
SQL>INSERT INTO STUDENT VALUES(1124,’ramu’,’IT’);
While executing the above query, it does not allow the value in the database because the value of the column ID is not greater than 45123
Check Constraints can be added to an already created table using the check constraints condition in alter table command
Syntax to add check constraints in Table alter the operation
ALTER TABLE TABLE_NAME ADD CONSTRAINT CONSTRAINT_NAME CHECK(COLUMN_NAME CONDITION);
The below query is the example of check constraints in the alter table command. Here, We have added check constraints for the column DEPARTMENT in the table STUDENT which we created already. It checks the value of the column DEPARTMENT, it can have only the value of IT, ECE, CSE, MECH and no other values are allowed in this column
ALTER TABLE STUDENT ADD CONSTRAINT check_dept (DEPARTMENT IN (‘IT’,’ECE’,’CSE’,’MECH’));
Drop Check Constraints
To remove the particular check constraints from the table, we can use the alter command to remove it completely. Let see the syntax for dropping the already created check constraints
ALTER TABLE TABLE_NAME DROP CONSTRAINTS CONSTRAINT_NAME;
In the existing table STUDENT, to delete or remove the check contraints check_dept from the column DEPARTMENT , we can use the below query
ALTER TABLE STUDENT DROP CONSTRAINT check_dept
Disable Check Constraints
If we don’t want to use existing check constraints at the same it may be wanted future , we can disable the check constraints instead of deleting them. So that we can use them later and suspend now
The syntax for disabling the check constraints.
ALTER TABLE TABLE_NAME NOCHECK CONSTRAINTS CONSTRAINT_NAME;
In the table student, we can disable the check constraint check_id using the below query
ALTER TABLE STUDENT NOCHECK CONSTRAINTS check_id;
Minus Operator
Minus operator is used between two in the selection table. Minus operator will subtract the common values of the first table from the second table. Basically, it removes the common values from two tables and prints the rest of the rows or value from the first table
The basic syntax for the Minus operator
SELECT COLUMN1, COLUMN2,….. FROM TABLE1 MINUS SELECT COLUMN1, COLUMN2,…. FROM TABLE2 ;
NOTE: The number of columns in the select statement for both the tables should be the same. The data type of the corresponding column should be the same. The Minus operator will be supported by the oracle and not supported by the SQL SERVER.
Alternative Operator
The Alternative operator in sql is ‘AS’. The Alternative operator is used to give alternative name for the column or table. The alternative operator is used for creating alias name for the column or table .Basically Alias name are used to give temporary name for the tables and columns. This makes the column more readable .The Alternative Operator will be used mostly in the select command
Alternative operator for Column
SELECT column_name AS alias_Name from table_name;
Let us consider the table with name Customers.
Customers
| first_name | last_name | city |
| John | Michael | Chennai |
| Raj | Kumar | Salem |
| Jaya | Krishna | Coimbatore |
To view the first_name as Customer_Name , we can use the alternative operator.
SQL>SELECT first_name AS Customer_Name from Customers;
Output:
| Customer_Name |
| John |
| Raj |
| Jaya |
The alternative operator mainly used to provide alternative name for concatenating of columns. If we are concatenating two columns as one , then using the alternative operator we can specify the column name for viewing.
Example 2:
SQL>Select first_name|| last_name AS Customer_Name from Customers;
Output:
| Customer_Name |
| JohnMichael |
| RajKumar |
| JayaKrishna |
Alternative operator for Table
As Like columns, we can also specify the alias name for the table using the Alternative operator
Mostly in Join conditions , we use the Alternative operator for providing alias name for the different table to avoid the confusion of columns in the table . For example , consider two tables Customers and Product .The Product table having the two column id and name . The Customers table having three column id , name and product_id.
Customers
| Id | Name | Product_id |
| 102 | Raj | 56 |
| 105 | Ram | 89 |
| 108 | Ravi | 98 |
| Id | Name |
| 56 | Apples |
| 89 | Oranges |
| 98 | Mango |
SQL>Select c.name AS Customer_Name, p.name AS Product_Name from Customers c , Product p where c.product_id = p.id;
Output:
| Customer_Name | Product_Name |
| Raj | Apples |
| Ram | Oranges |
| Ravi | Mango |
SQL – Wildcard operators
Wildcard function is used in SQL statements with LIKE operator. LIKE operator is used in WHERE clause to find the specified string in a record. If you want to find the first name start with ‘Al’ and last name end with ‘er’, like this scenario we can use LIKE operator find the record.
The below keywords are used in LIKE operator,
- % – It represents zero, one, or multiple characters
- _ – It represents a single character
Here I explain about how to represent the keywords in LIKE operator with description,
| LIKE Operator | Description |
| WHERE First_Name LIKE ‘A%’ | Finds any values that start with “A” |
| WHERE First_Name LIKE ‘%e’ | Finds any values that end with “e” |
| WHERE First_Name LIKE ‘%er%’ | Finds any values that have “er” in any position |
| WHERE First_Name LIKE ‘_a%’ | Finds any values that have “a” in the second position |
| WHERE First_Name LIKE ‘E__%’ | Finds any values that start with “E” and are at least 3 characters in length |
| WHERE City LIKE ‘T%o’ | Finds any values that start with “T” and ends with “o” |
Examples:
Actual Table: T_CUSTOMERS

- The following example is uses ‘%’ to find the customer’s FIRST_NAME start with ‘A’ letter.
Query:
select first_name, last_name, city
from t_customers where first_name like ‘A%’;

Here ‘A%’ (Wildcard operator) perform like to show the result start with ‘A’ and followed by some charters.
2. The following example is uses ‘%’ to find the customer’s FIRST_NAME end with ‘e’ letter.
Query:
select first_name, last_name, city
from t_customers where first_name like ‘%e’;

Here ‘%e’ perform like to display the results of first_name end with ‘e’ letter and preceded by some strings.
3. The following example is uses ‘%’ to find the customer’s FIRST_NAME contain ‘er’ letter in any position.
Query:
select first_name, last_name, city
from t_customers where first_name like ‘%er%’;

Here ‘%er%’ is used to find the results of first_name whoever contain ‘er’ letter in their name.
4.The following example is uses ‘%’ to find the customer’s FIRST_NAME where ‘_a’ letter appear in second position.
Query:
select first_name, last_name, city
from t_customers where first_name like ‘_a%’;

Here ‘%_a’ is used to find the first_name whoever has ‘a’ letter at second position.
5. The following example is uses ‘%’ to find the customer’s FIRST_NAME start with ‘E’ and that value contain at least 3 letters.
Query:
select first_name, last_name, city
from t_customers where first_name like ‘E__%’;

Here ‘E__%’ is used to find the first_name start with ‘E’ letter and the name should constrains at least 3 characters.
6. The following example is uses ‘%’ to find the customer’s CITY start with ‘T’ and end with ‘o’.
Query:
select first_name, last_name, city
from t_customers where city like ‘T%o’;

Here ‘T%o’ is used to find the customer’s details whoever has city which start with ‘T’ and end with ‘o’.
CONCATENATION OPERATOR
The symbol of the concatenation operator is || is used to add or concrete two or more columns or values in the table. Mostly the concatenation is used the select statement.
The concatenation is widely used in the select statement. The symbol of the concatenation operator is || is used to add or concate two or more columns or values in the table. If we want to join two values of two columns and show as a single column, in these scenarios we can use a concatenation operator.
The syntax for Concatenation operator
Select column_name1 || column_name2||…..from tablename
Let us consider the table with name Employee
Employee
| Emp_Name | Emp_Id | Emp_phone |
| Raja | 11895 | 9997779997 |
| Somu | 11896 | 9997779998 |
| Raju | 11897 | 9997779999 |
| Priya | 11898 | 9997779993 |
| Harini | 11899 | 9997779992 |
SQL>select Emp_Name ||Emp_Id from Employee;
Output:
| Emp_Name ||Emp_Id |
| Raja11895 |
| Somu11896 |
| Raju11897 |
| Priya11898 |
| Harini11899 |
In between the concatenation operator, we can directly use the string literal to add some string in the first, last or middle of the column values. The String literals and column is separated by the concatenation operator.
The syntax for using string literal in concatenation operator
Select column_name1 || ‘String literals’ ||…..from tablename;
Example 2:
SQL> select Emp_Name || ‘ id is ‘ || Emp_Id from Employee;
Output:
| Emp_Name ||Emp_Id |
| Raja id is 11895 |
| Somu id is 11896 |
| Raju id is 11897 |
| Priya id is 11898 |
| Harini id is 11899 |
If we are using the String literals in between two concatenation operator make sure the the String literals are enclosed within single quotes.
Between Operator
The Between operator is used to specify the range of values .The BETWEEN operator is used in the select statement. The values in the between can be number, alphabets and dates. It is also used in the insert, update, select and delete table commands. The between operator is used in the where clause. The AND operator is used between the two values of BETWEEN operator. The first value in between operator is used to specify the values greater than or equal to and second value represent lesser than or equal to .
syntax:
Select column_name1,column_name2,…….. from table_name where column_name between value_1 and value_2.
Example 1:
Let us consider the example below
Student
| Id | Name | Marks | Date_of_Birth |
| 102 | Raj | 50 | 08-01-2002 |
| 105 | Ram | 85 | 09-05-2004 |
| 108 | Ravi | 67 | 04-01-2007 |
| 109 | Sona | 78 | 22-11-2006 |
| 211 | Disney | 42 | 18-03-2002 |
| 258 | David | 74 | 30-06-2001 |
SQL>Select Name from Student where Marks between 60 and 80;
Output:
| Name |
| Ravi |
| Sona |
| David |
Example 2 :
SQL>Select id from Student where Date_of_Birth between 01-01-2001 and 01-01-2006;
Output:
| Id |
| 102 |
| 105 |
| 211 |
| 258 |
In the above example, we have given the query to print the id of the Students from Student Table whose Date_of_Birth between 01-01-2001 and 01-01-2006. Here it collects the id from the range given in between operator.
We can also use the Not operator in the between to avoid the specific range of values from the table
The Syntax for using Not operator with Between operator.
Select column_name1, column_name2,……. from tablename where NOT BETWEEN value_1 and value_2;
Let us consider an example
Example:
SQL>Select Name,Marks from Student where Marks NOT BETWEEN 50 and 60;
Output:
| Name | Marks |
| Ram | 85 |
| Ravi | 67 |
| Sona | 78 |
| Disney | 42 |
| David | 74 |
In the above query, it printing the column Name and Marks from the Student Table whose Marks is not between the value of 50 and 60 , it prints the rest of the values except the mark lesser than or equal to 60 and greater than or equal to 50.
IN Operator
IN Operator is used to specify the list of values in the particular column. The IN operator is widely used in the select, delete, insert and update statement. If you are using the IN operator in a query, this will retrieve the rows from the list of values in the IN operator. The list of values in the IN operator can be number, alphabets and dates.
The Syntax for IN operator:
Select column_name1,column_name2,….. from table_name where column_name IN (list of values);
Let us consider an example
Customer_details
| Id | Name | Purchased_Amount |
| 10245 | Raj | 5000 |
| 10575 | Ram | 8500 |
| 10877 | Ravi | 6700 |
| 10974 | Sona | 7100 |
| 21178 | Disney | 4200 |
| 25875 | David | 7400 |
SQL>select Id,Name, Purchased_Amount from Customer_details where Purchased_Amount IN (5000 , 7100 , 7400);
Output:
| Id | Name | Purchased_Amount |
| 10245 | Raj | 5000 |
| 10974 | Sona | 7100 |
| 25875 | David | 7400 |
We can also use the Not operator with In operator to view the rows except from the list of values mentioned, for this scenario we have use the combination of Not and In operator as NOT IN .
The Syntax to use NOT IN .
Select column_name1,column_name2,….. from table_name where column_name NOT IN (list of values);
Example 2 :
SQL>select Id,Name, Purchased_Amount from Customer_details where Purchased_Amount NOT IN (6700, 4200);
Output:
| Id | Name | Purchased_Amount |
| 10245 | Raj | 5000 |
| 10575 | Ram | 8500 |
| 10974 | Sona | 7100 |
| 25875 | David | 7400 |
LIKE operator:
While doing pattern matching, we can use like condition in where clause and listed, we may wish to recover all segments where the tuples begin with the letter ‘y’, or begin with ‘b’ and end with ‘l’, or much progressively convoluted and prohibitive string designs.
- %: It used to the match zero or more than characters.
- _: It used to match exactly one character.
| PATTERN | MEANING |
| ‘a%’ | Strings value starts with ‘a’ |
| ‘%a’ | strings value end with ‘a’ |
| ‘a%t’ | String Value is contained to start with ‘a’ and then end with ‘t’ |
| ‘%wow%’ | String Value is contained to the substring ‘wow’ at any position. |
| ‘_wow%’ | String Value is contained to the substring ‘wow’ at the second position value. |
| ‘_a%’ | String value contains ‘a’ at the second value position. |
| ‘a_%_%’ | String Value is starting with ‘a’ and then the contain at least 2 more characters Value. |
Scenario1: list all employee details whose names are started with A.
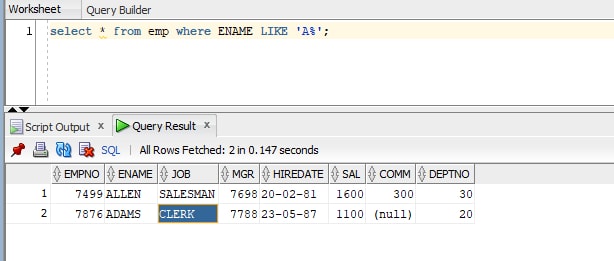
Scenario 2: list all employee details whose names are ending with N.
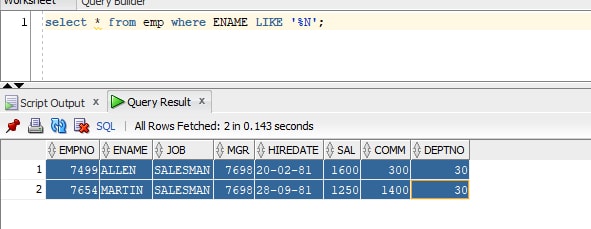
Scenario 3: list all employee details whose name start with A in second position.
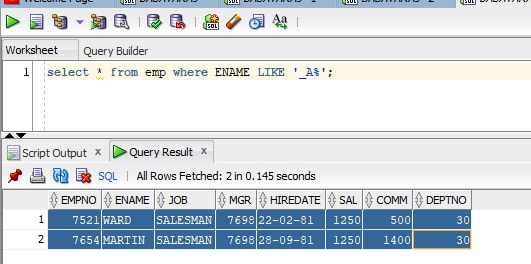
Scenario 4: list all employee details whose name have only 4 characters.
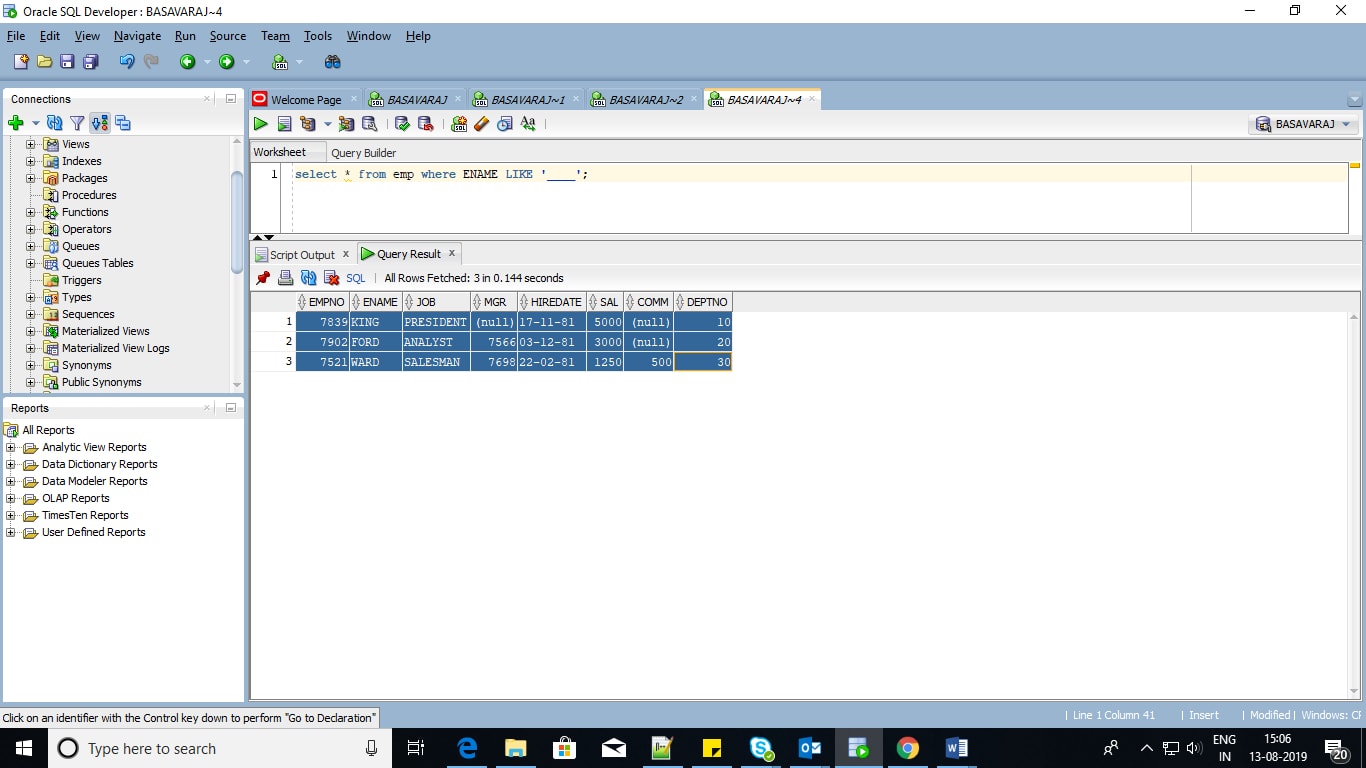
Example 2:
we have a relation, studnet. We want to test various patterns using the LIKE clause:
Supplier Table:
| S.NO | STUDENT NAME | COURSE |
| 1 | Vignes | Data Science |
| 2 | Raju | RPA |
| 3 | Meena | Selenium |
| 4 | Arasu | Java |
| 5 | Ranji kuamr | AI |
| 6 | Ram | Python |
FROM Studnet
WHERE Name LIKE ‘Ca%’;
Output:
| 3 | Meena | Selenium |
| 4 | Arasu | Java |
FROM Studnet
WHERE Course LIKE ‘%Okhla%’;
Output:
| 1 | Vignes | Data Science |
| 3 | Meena | Selenium |
FROM Student WHERE Name LIKE ‘_ango%’;
Output:
| 2 | Raju | RPA |
SQL-Create Domain:
We are used to the create the new domain a values restricts to allowed the set of values. Here who define the domain for database it becomes a oweners.
We are creating the Company employee details data from the database at that time we are create the domain based constraints.For example several table must contains employee databirth.So all columns check and constraints to verify the company data of birth syntax.
So Domain rather then setting up each tables.
Here We are using the Domain data based on the statudents table checks.
CREATE DOMAIN Com_Data AS REAL CHECK
(value >= 0 AND value <=10)
Now com_data domain data create now we are using the anywhere in the table of the database.
CRETAE TABLE EmployeeDetails(
Id char(9) PRIMARY KEY,
email varchar(25),
cpi Com_Data);
Now every com_data will check the constrainsts and add the employee details tables.
Here we are using to different data from the check constraints in two tables
-
- Insert into employeeDetails values (10, see@gmail.com,6.5)
Here the constraints not violate the constarints.
- Insert into employeeDetails values(12,rahav@gmail.com,19)
Here the constraints violate the constraints for not satisfied check the constraints.
SQL | Except Clause
In SQL, EXCEPT returns those tuples that are returned by the standard SELECT headway, and not returned constantly SELECT development.
This is proportionate to utilizing a subtract head in social variable based math.
Example 1:
Student-Table
| Student- ID | Student NAME | Course Name |
| 101 | Raghul | Hadoop |
| 102 | Keerthana | Java |
| 103 | Kevin | SQL |
| 104 | Kevin | Data Science |
| 105 | Mano | RPA |
| 106 | Swetha | Oracle |
| Professor ID | Professor Name | Course Name |
| 301 | Imran | Hadoop |
| 302 | Jancy | Data science |
| 303 | Milan | RPA |
| 304 | Sundram | SQL |
Syntax For Except Clause
| Select * Student Name from Students Table Except Select * from Professor Name from Professor Table |
| Raghul Kevin Swetha |
Syntax:
| Select * Namefrom Students Name EXCEPT ALL Select StudentName From Professor Table; |
| Raghul Kevin Kevin Swetha |
Different between the Except and Not-in Clause
EXCEPT is automatically removing the all duplicates use in the final result, whereas NOT IN is maintains the duplicate tuples. It is more necessary to note that Except is no maintained by the MySQL.

 +1 201-949-7520
 +91-9707 240 250