
Locators in Selenium
Webpage
Locating a web element is more challenging because it is difficult to find a web element in the webpage and also automating the web elements. To make this task simple, we have something called locators that are used in Selenium.
Let us see more about below topics in a detailed manner,
- What is meant by locators?
- Classification of locators in Selenium
- Id locator
- Name locator
3. Partial link text and linkText
- CSS Selector
- XPath
What is meant by Locators?
Locator is defined as the address which is used to identify web elements on the webpage. GUI elements are of different types like Checkboxes, Buttons, Text boxes, etc. Locators instruct the Selenium IDE to work with the correct GUI element. The tester needs to find the exact GUI element since the prerequisite criteria for the creation of an automation test script, but it is a difficult task. So, a good automation tester should ensure using the right locator.
Classification of Locators
The locators are mainly classified into 5 types, namely:
- Id locator
- Name locator
- Partial link text and linkText
- CSS Selector
- XPath
Id Locator
There is the easiest way for identifying the web element using Id locator. It is the fastest and safest locator when compared to other locators so that it is considered as the first priority for finding the web element. For instance, Account number or employee id is unique.
We can see how an ID locator works:
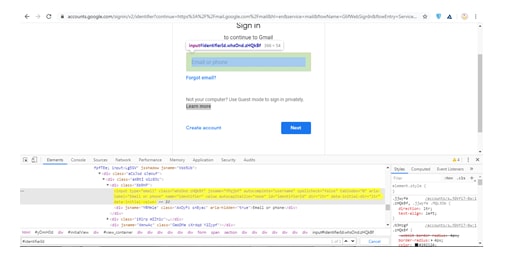
Step 1:
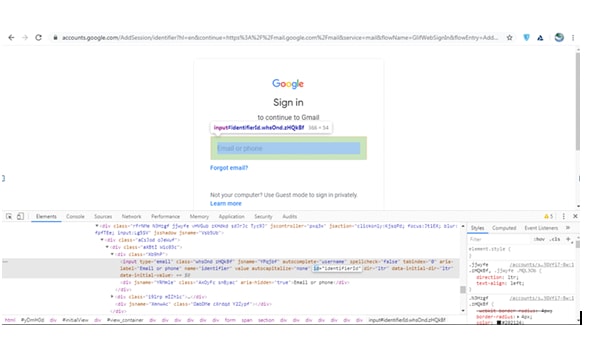
I am launching a Chrome driver and navigating to gmail.com. Now, ID locator is used to locating email or phone text boxes.

Step 2:
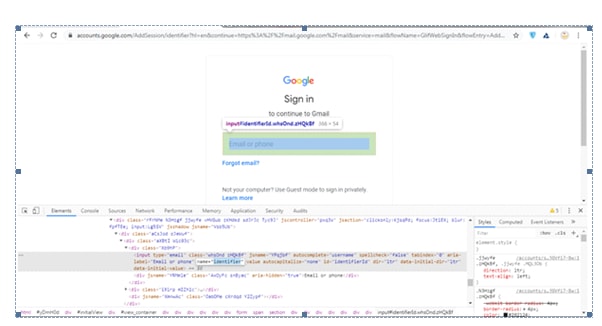
On inspection of specified web elements, the user has an attribute, input tag similar to id and name. Now we are going to locate the web element with Id locator to locate the email or phone text box.i.e. identified
package Besant;
import java.util.concurrent.TimeUnit;
import org.openqa.selenium.By;
import org.openqa.selenium.chrome.ChromeDriver;
public class Locators {
public static void main(String[] args) {
System.setProperty("webdriver.chrome.driver", "C://Besant//chromedriver.exe");
WebDriver driver = new ChromeDriver();
driver.manage().window().maximize();
driver.manage().timeouts().implicitlyWait(30, TimeUnit.SECONDS);
driver.get("https://accounts.google.com/ServiceLogin/identifier?continue=https%3A%2F%2Fmail.google.com%2Fmail%2F%3Ftab%3Dwm%26ogbl HYPERLINK "https://accounts.google.com/ServiceLogin/identifier?continue=https%3A%2F%2Fmail.google.com%2Fmail%2F%3Ftab%3Dwm%26ogbl&osid=1&service=mail<mpl=default&rm=false&flowName=GlifWebSignIn&flowEntry=AddSession"& HYPERLINK "https://accounts.google.com/ServiceLogin/identifier?continue=https%3A%2F%2Fmail.google.com%2Fmail%2F%3Ftab%3Dwm%26ogbl&osid=1&service=mail<mpl=default&rm=false&flowName=GlifWebSignIn&flowEntry=AddSession"osid=1 HYPERLINK "https://accounts.google.com/ServiceLogin/identifier?continue=https%3A%2F%2Fmail.google.com%2Fmail%2F%3Ftab%3Dwm%26ogbl&osid=1&service=mail<mpl=default&rm=false&flowName=GlifWebSignIn&flowEntry=AddSession"& HYPERLINK "https://accounts.google.com/ServiceLogin/identifier?continue=https%3A%2F%2Fmail.google.com%2Fmail%2F%3Ftab%3Dwm%26ogbl&osid=1&service=mail<mpl=default&rm=false&flowName=GlifWebSignIn&flowEntry=AddSession"service=mail HYPERLINK "https://accounts.google.com/ServiceLogin/identifier?continue=https%3A%2F%2Fmail.google.com%2Fmail%2F%3Ftab%3Dwm%26ogbl&osid=1&service=mail<mpl=default&rm=false&flowName=GlifWebSignIn&flowEntry=AddSession"& HYPERLINK "https://accounts.google.com/ServiceLogin/identifier?continue=https%3A%2F%2Fmail.google.com%2Fmail%2F%3Ftab%3Dwm%26ogbl&osid=1&service=mail<mpl=default&rm=false&flowName=GlifWebSignIn&flowEntry=AddSession"ltmpl=default HYPERLINK "https://accounts.google.com/ServiceLogin/identifier?continue=https%3A%2F%2Fmail.google.com%2Fmail%2F%3Ftab%3Dwm%26ogbl&osid=1&service=mail<mpl=default&rm=false&flowName=GlifWebSignIn&flowEntry=AddSession"& HYPERLINK "https://accounts.google.com/ServiceLogin/identifier?continue=https%3A%2F%2Fmail.google.com%2Fmail%2F%3Ftab%3Dwm%26ogbl&osid=1&service=mail<mpl=default&rm=false&flowName=GlifWebSignIn&flowEntry=AddSession"rm=false HYPERLINK "https://accounts.google.com/ServiceLogin/identifier?continue=https%3A%2F%2Fmail.google.com%2Fmail%2F%3Ftab%3Dwm%26ogbl&osid=1&service=mail<mpl=default&rm=false&flowName=GlifWebSignIn&flowEntry=AddSession"& HYPERLINK "https://accounts.google.com/ServiceLogin/identifier?continue=https%3A%2F%2Fmail.google.com%2Fmail%2F%3Ftab%3Dwm%26ogbl&osid=1&service=mail<mpl=default&rm=false&flowName=GlifWebSignIn&flowEntry=AddSession"flowName=GlifWebSignIn HYPERLINK "https://accounts.google.com/ServiceLogin/identifier?continue=https%3A%2F%2Fmail.google.com%2Fmail%2F%3Ftab%3Dwm%26ogbl&osid=1&service=mail<mpl=default&rm=false&flowName=GlifWebSignIn&flowEntry=AddSession"& HYPERLINK "https://accounts.google.com/ServiceLogin/identifier?continue=https%3A%2F%2Fmail.google.com%2Fmail%2F%3Ftab%3Dwm%26ogbl&osid=1&service=mail<mpl=default&rm=false&flowName=GlifWebSignIn&flowEntry=AddSession"flowEntry=AddSession"); //text box : id locator
driver.findElement(By.id(" HYPERLINK "mailto:driver.findElement(By.id(%22identifierId%20%22)).sendKeys(%22besanttechnologies@gmail.com"identifierId HYPERLINK "mailto:driver.findElement(By.id(%22identifierId%20%22)).sendKeys(%22besanttechnologies@gmail.com" ")).sendKeys("besanttechnologies@gmail.com");
|
Name locator
The second type to locate the web element is the name locator. In this, it will return a first element along with a value of name attribute. If there are no element matches with the name attribute, a NoSuchElementException is thrown.
We can see how a name locator works:
Step 1:
I am launching a Chrome driver and navigate to gmail.com. Now, I able to locate the email text box by name Locator.
Step 2:
Let’s understand how to identify using name Locator with below code that helps in automation
//name locator : text boxdriver.findElement(By.name(" HYPERLINK "mailto:driver.findElement(By.name(%22identifier%22))
.besanttechnologies@gmail.com%20"identifier HYPERLINK "mailto:driver.findElement(By.name(%22identifier%22))
.besanttechnologies@gmail.com%20"")).besanttechnologies@gmail.com");
|
linkText
LinkText is used for identifying hyperlinks on the webpage. It is determined by anchor tag(<a>). Anchor tag along with linktext is used to create hyperlinks on the webpage.
We can see how a link text locator works:
Step 1:
I am launching a Chrome driver and navigate to gmail.com. Now, I able to locate the email text box by Link text Locator.
Step 2:
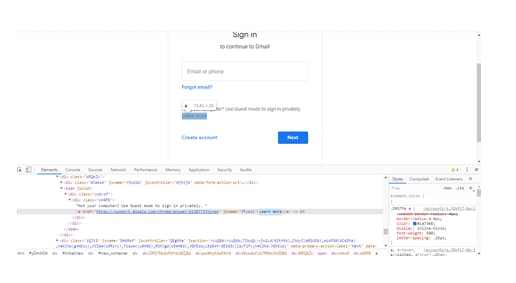
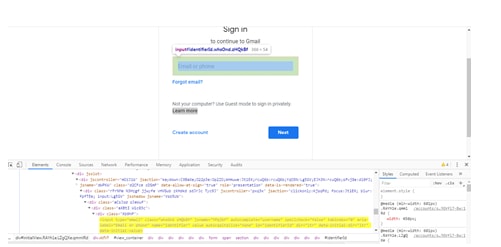
On inspection of the specified web element, you can see that it has an anchor tag and no attributes similar to id and name. Hence, we are going to locate the web element with linkText locator to locate “Learn more”
Step 3:
From the above-mentioned Snippet, you can view the text “Learn more”. So, We can take text and also use the linkText locator for executing the below code that helps in automation
//linkText locator for links
driver.findElement(By.linkText("Learn more")).click();
|
Step 4:
Sometimes, we can make use of a partial portion in the link text element. In that case, you make use of PartialLink Text in locating elements. Let’s understand the below example. I take the “Learn more” link. In spite of using full text, we can use the partial form “Learn” of the text as shown in below code
//partial linkText locator : links
findElement(By.partiallinkText("Learn")).click();
|
CSS Selectors
It is used to identify one element or more than one element on a web page. CSS selectors are used for providing the style rule to web pages. For locating the complex elements, it is the better way.
Let’s understand with the example of Gmail login by using CSS selectors. When identifying CSS Selector with ID, it starts with the # sign and the Id attribute value is entered as identified, the element will be highlighted. This implies that the user locates using the CSS selector with ID.
We can use “#identifierId” CSS selector as shown in below code
// CSS selector
driver.findElement(By.cssSelector("#identifierId")).click();
|
XPath Locator
XPath Locator is used in finding dynamically changing objects and it is the most important Locator for identifying elements. It Contained path expressions and it is classified into absolute XPath and relative XPath
Let’s see how to locate an element by using XPath with the same example. I am launching a Chrome driver and redirect to gmail.com. Now, We can locate the text box by using the XPath. On inspection of the specified web element, the user can notice that it has attributes, input tags similar to name and id. Hence, we are going to locate the web element with the XPath locator to locate the element.
To identify Elements with XPath, we have to press Ctrl + F for launching a search box on the chrome tool. Now we can able to write XPath and it highlights the specified object. From the above snippet, the input tag can be viewed. Here, starting with “// input” which implies the tag name. We can use of type attribute and the value of attribute ‘email’ as single quotes. This gives the below expression of XPath.
//input[@type=’ email’] |
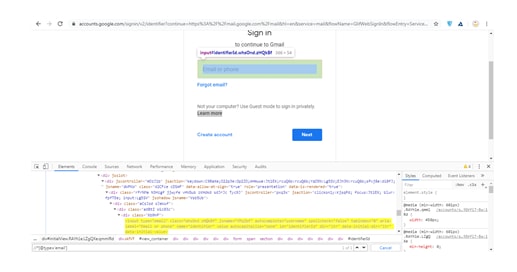
From the above snippet, we can see the highlighted text use in locating the element Here, we can use XPath “//input[@type=’ email’]” as shown in below code
//xpath :search box driver.findElement( HYPERLINK "mailto:driver.findElement(By.xpath(%22//input%5B@id='q'%5D%22)).sendKeys (%22Selenium"By.xpath(“//*[@type=‘email’]”); |

 +1 201-949-7520
 +91-9707 240 250